Excellence in Mid-Market UCaaS Delivery
Overview
The evolution of unified communications (UC) has presented significant opportunities and challenges for mid-market operators. As technologies like Microsoft Teams disrupt traditional models, operators must adapt to remain competitive. Metaswitch, with its Rhino Telephone Application Server (TAS), offers a platform for telephony software development that enables differentiation in the marketplace. By exploring its deployment, this project aims to demonstrate the potential for mid-market operators to leverage this tool in addressing evolving customer needs.
This technical exploration not only evaluates the Rhino TAS SDK as a platform but also showcases the critical role systems administration plays in deploying and managing customer-facing services effectively.
Background
The telecom industry has long been on a journey to modernize its infrastructure. The shift from aging circuit-switched systems to flexible, packet-switched networks has facilitated the retirement of legacy hardware, with software-based platforms taking over the functions of physical switches. Technologies like VoIP, Voice over LTE (VoLTE), and the IP Multimedia Subsystem (IMS) have been at the heart of these efforts, enabling greater efficiency and scalability.
Throughout this transformation, the importance of maintaining the reliability of traditional telephony was clear. Telephones continue to be indispensable, trusted devices that people rely on, particularly in emergencies, with an expectation that they will simply work without fail. Therefore, while the telecom landscape was modernizing, the industry needed to ensure that this shift did not compromise the bulletproof reliability of dial tone services.
To meet these challenges, Metaswitch’s Rhino Telephone Application Server (TAS) has become a widely adopted platform for both mobile and traditional carriers. Its design prioritizes stability while supporting a broad range of modern protocols, empowering carriers to deliver reliable, high-quality voice and multimedia services over advanced IP networks.
While Rhino TAS is predominantly known for its role in carrier infrastructure, its architecture and capabilities make it highly adaptable for other sectors, including mid-market UCaaS operators. This makes it an ideal platform for those operators seeking to differentiate themselves in the increasingly competitive space. Rhino TAS offers the flexibility and power to support complex, customized telephony services, such as advanced routing, logic, and integrations—capabilities that are key for mid-market operators looking to offer more than just basic PSTN integration services.
Microsoft Teams software addresses many communication needs, but it leaves opportunities for enhancement—both in terms of services and product functionality—that operators can fill. Operators, particularly those with a long-standing presence in the telecom industry—firms that developed robust cloud PBX and CCaaS offerings before Microsoft Teams reshaped the market—are well-positioned to continue creating advanced software for telephony systems. These operators are not newcomers merely meeting the minimum certification requirements for Operator Connect; they bring a deep history of telecom expertise and a proven track record of excellence.
The UCaaS market is rapidly expanding. While Teams is the centerpiece of this transformation, the true value for mid-market UCaaS operators lies in their ability to deliver value-added services that Microsoft doesn’t directly provide. As channel partners of Microsoft, operators play a critical role in offering services such as PSTN integration, legacy system migration, and ongoing support, helping businesses transition smoothly to modern communication solutions.
Opportunities Left for Mid-Market Operators
Big telecom carriers and tech giants often overlook opportunities in the mid-market UCaaS space. Mid-market customers require the same high-touch, detailed migration and integration work as enterprise customers, yet they don’t offer the same large-scale revenue potential that drives the focus of bigger players.
This is where mid-market operators come in. They deliver tailored solutions that address the needs of peer-sized businesses—needs that larger providers are unwilling to fulfill. This creates a distinct niche in the UCaaS market, where success hinges not only on the ability to integrate the right partnerships, technologies, and operational expertise, but also on delivering comprehensive service. The best operators distinguish themselves through superior service delivery—advising, implementing, and supporting their customers in ways the tech giants can’t match.
Differentiation within the Mid-Market Segment
While exceptional service delivery is key to success within the UCaaS mid-market, strategic platform selection plays a role in helping operators enhance that service. While all mid-market operators aim to fill gaps left by larger players, it is the most successful operators who make deliberate platform choices to differentiate themselves. The choice of platform directly influences an operator’s ability to deliver value, foster innovation, and meet the specific needs of their customers.
Broadly speaking, operators can select from three distinct classes of solutions. The first category consists of barebones, “SBC-only” systems, designed to meet the minimum requirements for market entry with minimal investment. The second category adds configurable PBX software alongside the SBC. These platforms offer significant flexibility but are limited by the inherent constraints of off-the-shelf software. The third category encompasses fully custom solutions built on highly adaptable platforms, where the SBC remains foundational, but off-the-shelf PBX software is replaced with custom software development.
To illustrate the range of approaches available to mid-market operators, consider men’s suiting:
- Off-the-shelf suits: aligns with basic SBCs and call routing—adequate for meeting minimum qualifications like those required for Operator Connect but offering no meaningful technical differentiation.
- Made-to-measure suits: represents the integration of commercially available, configurable PBX software—offering a better fit for customer needs, but still constrained by predefined templates.
- Fully bespoke suits: corresponds to custom-developed software on platforms like Metaswitch Rhino TAS. This approach enables operators to break free from predefined limits and craft solutions uniquely tailored to their customers.
Build Rather Than Buy: Market Leadership through Custom Solutions
Operators have a unique opportunity to establish market leadership by positioning themselves as software developers. By doing so, they can move beyond the limitations of off-the-shelf solutions and create offerings that are uniquely suited to their customers’ needs.
Step One: Clearly articulate the gaps left by Teams and design a product to sit ahead of Teams in the call flow. This product should implement the exact features needed to fill those gaps. Think of this as your base product—sleek, purpose-built, and foundational to your service offering.
Step Two: During the sales phase, identify customer needs and customization opportunities, documenting these requirements in the contract or SOW. In the onboarding phase, these requirements are implemented through a focused development sprint, creating custom middleware that integrates with customer end systems, along with other code enhancements. This approach ensures each deployment is tailored precisely to the customer’s needs.
By choosing Metaswitch Rhino TAS, operators can:
- Address Gaps Left by Teams: Deliver tailored solutions that broadly enhance and complement Microsoft Teams’ functionality, ensuring they meet the wider market needs.
- Tackle Specific Customer Requirements: Provide custom solutions that precisely address the unique and individual demands of each customer.
- Enable Future Vision: Empower product management to roadmap and develop new features, never worrying about off-the-shelf PBX software limitations.
- Adapt Quickly: Address specific customer needs on your timeline, not an upstream vendor’s.
- Deepen Customer Relationships: Offer tailored solutions that position the operator as a long-term partner, not just a service provider.
Calling Your Own Number: A Solution Architecture Proposal
Enhanced call handling begins by placing yourself into the call flow. While SBCs typically route calls based on static identifiers like Dialed Number Identification Service (DNIS), a more agile approach moves the routing configurtion entirely out of the SBC. Instead, this logic resides in a dedicated call-handling application—perhaps called the Routing Manager—a small but powerful system running alongside the SBC.
The SBC is not instructed about the call’s final destination; instead, its configuration hands every incoming call to the Routing Manager. This step represents a key transition in the call flow, providing an opportunity to establish control and implement solutions that address gaps left by downstream systems like Teams or accommodate customer-specific requirements.
The Routing Manager can perform real-time lookups using external systems, such as CRMs or customer databases, whether on-premises or in the cloud, to inform its routing decision. Once the decision is made, the Routing Manager forwards the call to its final destination—such as Teams or another endpoint—via SIP REFER.
For example, imagine a call arriving for a customer with specific routing rules. The Routing Manager could:
- Query a CRM or third-party API for live data.
- Dynamically adjust routing based on the caller’s history, preferences, or current status.
- Apply advanced logic tailored to compliance, business workflows, or other requirements.
Reality Check: Stability as the Cornerstone of Success
While differentiation through advanced features is a compelling sales story, it’s important to recognize that many customers do not have unique technical requirements. For these customers, the decision to partner with a UCaaS provider often hinges on factors like reputation, references, alignment in company size, and the appeal of consolidating telecom needs with a single, trusted partner. This approach provides one point of accountability, eliminates the risk of finger-pointing between vendors, and ensures access to a knowledgeable advisor who understands the market landscape and product offerings.
Retention is driven by stable, dependable service and consistent execution in key areas like billing accuracy, responsive and effective support, efficient move-add-change, and account management. While issues are inevitable, how they are handled can make all the difference. When challenges arise, prompt and transparent resolution not only helps maintain trust but can strengthen the customer relationship by demonstrating a commitment to their success and minimizing disruption. Stability remains the top priority, as technical issues or service interruptions can quickly undermine trust and jeopardize the relationship.
As Microsoft Teams with Calling Plans continues to address its limitations, mid-market operators face growing competition from both big tech giants and peer competitors. In this competitive landscape, technical execution is mandatory—and the role of systems administrators in ensuring solid execution cannot be overstated. At renewal time, the goal is for technical execution and NOC support to be viewed as an asset to retention, rather than an obstacle.
Managing Service Quality and Reliability in UCaaS Operations
Successfully delivering PSTN-integrated UCaaS solutions requires not just robust infrastructure, but also the ability to manage complex relationships and responsibilities across multiple service layers.
Operators manage the call flow from the PSTN, often bundling the telecom carrier into the opportunity. This dual role means operators not only maintain their own SBCs, which sit within the call flow, but also rely on third-party carriers, who are equally vulnerable to outages.
Ultimately, the operator bears responsibility for the service’s overall quality. Any service disruption—whether from the operator’s internal systems or from the third-party telecom carrier—can damage the operator’s reputation: customers see the operator as the single point of contact and accountability.
Outages at the carrier level often provide no visibility to the operator. The first—and sometimes only—indication of an issue may be zero call volume, a metric that can be hard to interpret accurately. Is it a carrier outage, or just a lull? Without proactive visibility into carrier systems, operators must either rely on basic monitoring methods (where zero call volume triggers alerts), which means dealing with false positives, or wait for customer complaints.
In UCaaS environments, balancing call flow resilience with reliable Internet access is crucial. While voice paths can remain functional during an outage, relying on a single carrier for Internet access can disrupt real-time app integrations, like customer data lookups, affecting the user experience. Using blended Internet connections with multiple carriers ensures both call flow and application performance remain stable, even during carrier-specific disruptions. This approach is vital for maintaining service quality and avoiding performance degradation in real-time integrations.
The Role of Expert Systems Administrators in UCaaS
Flawless execution across all operational areas is critical, but systems administrators play an especially vital role in maintaining the infrastructure that powers essential services like call handling, routing, monitoring, and failover mechanisms. This role requires a deep understanding of the systems at play and a proactive approach to ensuring reliability.
Effective monitoring begins with an intimate understanding of your infrastructure stack. This includes knowing the processes (e.g., Jetty, Apache, MySQL) that should be running, their expected quantities, and their roles. It also involves identifying health check and status-oriented URLs. Health check URLs provide basic up/down status, while status-oriented endpoints often expose metrics that can be scraped for deeper insights.
Metrics form the backbone of two critical monitoring tools: alerts and dashboards. Alerts are your early warning system, auto-detecting problems and triggering alarms. They rely entirely on the metrics you’ve collected, so unearthing the right data points is essential. Dashboards, on the other hand, are your daily touchpoint with the system. Regularly reviewing these graphs helps you internalize what “normal” looks like, making it easier to spot anomalies at a glance. This combination of proactive alerts and intuitive dashboards strengthens your ability to detect and respond to issues swiftly.
Logs are another indispensable resource in monitoring. Knowing where they are, how they’re structured, and what types of errors to expect is fundamental. Proactive log analysis can identify problems before they escalate, while post-incident reviews often reveal gaps in detection or response. These insights guide iterative improvements, enhancing system resilience over time.
When incidents occur, a systems administrator’s ability to remain composed and methodical is critical. Troubleshooting demands clear analysis, isolating root causes, and devising immediate workarounds or solutions. This process ensures disruptions are addressed with minimal impact.
Failover mechanisms are another cornerstone of reliability, but their effectiveness depends on realistic design. Too often, failover systems are built for simplistic failure modes, such as complete hardware outages, while more nuanced edge cases—like partial failures or miscommunication between components—are overlooked. For instance, a failure might not propagate properly through the stack, allowing a phone call to proceed along a broken path while bypassing a redundant system that could handle it. Thoughtful failover design, informed by real-world failure scenarios, ensures these mechanisms respond effectively to diverse conditions.
Capacity management is equally important, particularly during failover events. Shifting loads between sites can strain shared resources like SIP trunks and voice channels. Expert administrators anticipate these demands, balancing capacity to prevent overloads and maintain service continuity.
Operational reliability hinges on continuous refinement. Each incident provides lessons—whether from overlooked metrics, delayed alerts, or unforeseen failure modes. Regular evaluations of what worked and what didn’t drive improvements, closing gaps and addressing vulnerabilities. This iterative process ensures systems remain robust, adaptable, and aligned with evolving challenges. By fostering a culture of learning and improvement, systems administrators help maintain customer trust and strengthen the backbone of critical services.
Unboxing Metaswitch Rhino TAS SDK
With the clear market need for advanced, customizable UCaaS solutions in mind, I embarked on a Proof-of-Concept deployment of the Metaswitch Rhino Telephony Application Server (TAS). This PoC serves as the foundational first step in demonstrating the capabilities of Rhino TAS and its potential to address the complex requirements of mid-market operators.
This Proof-of-Concept Deployment outlines my efforts to deploy Rhino TAS software, including its SIP Resource Adapter and sample applications, to create a basic SIP PBX. While this represents only a small portion of Rhino TAS’s full capabilities, it serves as an entry point for engaging with the platform and laying the groundwork for broader deployment. By demonstrating this foundational setup, I aim to showcase the platform’s potential and illustrate the critical role of skilled administrators in leveraging its capabilities effectively.
Reviewing Vendor Documentation and Requirements
In preparation for this project, I carefully reviewed Metaswitch’s documentation to ensure alignment with their stated requirements and best practices. As an experienced IT professional, I understand the importance of thorough preparation and adhering to vendor specifications, especially in environments as complex as telecom systems. Below are the critical takeaways from the documentation and their implications for my project:
-
Rhino TAS is available in two installer flavors: the “SDK” version, which bundles a free license key for developer testing and evaluation purposes, and the production version, which requires a paid license.
-
The Rhino TAS SDK version has a built-in rate limit to prevent production use, making it strictly for development and testing purposes.
-
The Rhino TAS SDK is supported on Red Hat, CentOS, and Ubuntu Linux distributions. Windows is mentioned but not seriously. For production deployments, only Red Hat Enterprise Linux (RHEL) 8 and 9 are supported.
-
The Rhino TAS SDK supports both Oracle JDK (version 11 only) and OpenJDK (versions 11 or 17). However, OpenJDK must be the version packaged for Red Hat repositories to be supported.
-
Rhino TAS includes an admin web UI called Rhino Element Manager (REM), with two deployment options: embedded and standalone. While JDK 17 support was recently introduced in the latest version, it is currently only available for the standalone REM; the embedded REM still requires JDK 11.
Analysis and Decision on Rhino TAS Software, OS and JDK Selection
After reviewing Metaswitch documentation and considering my requirements, I have decided to deploy the Rhino TAS SDK version on top of Rocky Linux 9.5 with OpenJDK 17 for the PoC. Standalone REM. Below is the rationale behind this decision:
-
The SDK version is the only available version of Rhino TAS for my PoC, making it well-suited for evaluation purposes. While the production version may be available for evaluation to qualified prospects, I did not inquire further as the SDK version meets the requirements for this PoC.
-
Metaswitch’s preference for Red Hat platforms aligns with my decision to use Rocky Linux as a reliable, free RHEL alternative.
-
I prefer OpenJDK over Oracle JDK because OpenJDK remains free for commercial use, unlike Oracle JDK, which typically requires a paid subscription for commercial environments. A well-known caveat in the industry is that Oracle JDK updates are not available through standard package repositories like dnf or apt, requiring manual updates—a time-consuming process that adds unnecessary hassle to system maintenance.
-
OpenJDK 17 offers a clear, long-term lifecycle with public updates until 2029, ensuring stability for the next several years. In contrast, OpenJDK 11, though an LTS release, is already past its End of Public Updates (Sept 2023), making it less viable for long-term use without commercial support. Deploying JDK 11 today risks requiring early re-deployment, while JDK 17 provides more extended support, reducing the need for revisits.
-
Metaswitch has removed Oracle as a supported vendor starting with JDK 17, further supporting the move away from Oracle and reinforcing OpenJDK as the preferred option for future-proofing deployments.
-
Red Hat Enterprise Linux (RHEL) is not available to me and is unlikely to be accessible to hobbyists who might want to follow along with or replicate this project. CentOS is supported, but Rocky Linux is today considered the successor to CentOS as a reliable RHEL clone.
-
Rocky Linux includes the same OpenJDK packages created for Red Hat, making it an excellent choice that aligns with Metaswitch’s recommendations.
-
In telecom, business partners sometimes inquire about underlying systems, especially when the nature of the partnership involves placing a box into the customer’s network. For years, Red Hat has been the best-accepted answer.
-
While it is generally advisable to stick with supported platforms, this is less critical in a PoC environment where vendor support is not accessible. In Metaswitch’s case, even community support is gated behind paid access. Despite this, I chose a configuration that aligns closely with their documented guidance to maintain best practices and ensure compatibility in the absence of external support.
Preparing the Operating System
The starting point is a basic install from Rocky-9.5-x86_64-minimal.iso with defaults taken at install time. I assigned 2 vCPU and 4 GB RAM. Become the root user or use a privilege escalation mechanism for the commands in this section.
-
Set a hostname.
hostnamectl set-hostname RhinoTAS-SDK.lab4.decoursey.com
-
Create a definition of SIP traffic for the OS-level software firewall.
cat << EOF > /etc/firewalld/services/sip.xml
<?xml version="1.0" encoding="utf-8"?>
<service>
    <short>SIP</short>
    <description>Session Initiation Protocol</description>
    <port protocol="udp" port="5060"/>
    <port protocol="tcp" port="5060"/>
</service>
EOF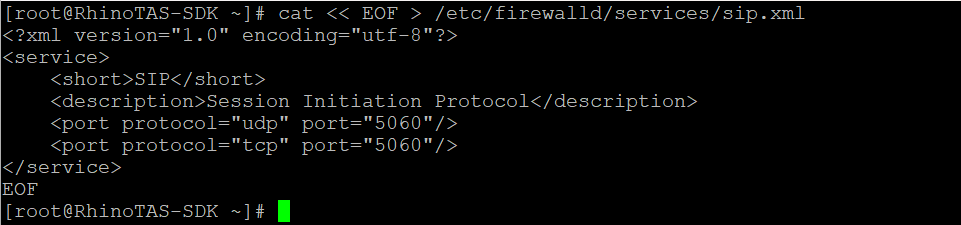
-
Create a definition of REM traffic for the OS-level software firewall.
cat << EOF > /etc/firewalld/services/rem.xml
<?xml version="1.0" encoding="utf-8"?>
<service>
    <short>rem</short>
    <description>Rhino Element Manager</description>
    <port protocol="tcp" port="8080"/>
</service>
EOF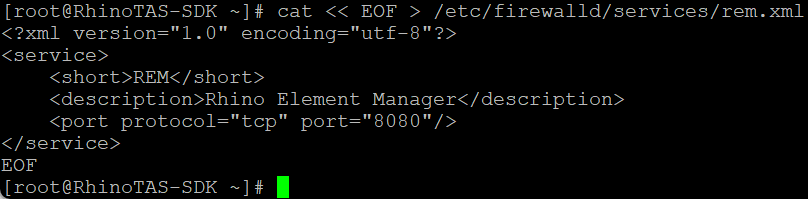
-
Reconfigure and reload the OS-level software firewall.
firewall-cmd --permanent --add-service=sip
firewall-cmd --permanent --add-service=rem
firewall-cmd --reload
Note: Disabling the firewall temporarily during evaluations is a common shortcut to avoid gathering the system’s connectivity requirements. However, this “temporary” measure often becomes permanent. As the system moves into live use, the temptation to skip proper configuration increases, as administrators are reluctant to make changes in production environments to avoid disruption. The best practice is to define and configure firewall rules early in the deployment process.
-
Run any available updates and, if a kernel update is installed, reboot the machine.
dnf -qy update
shutdown -r now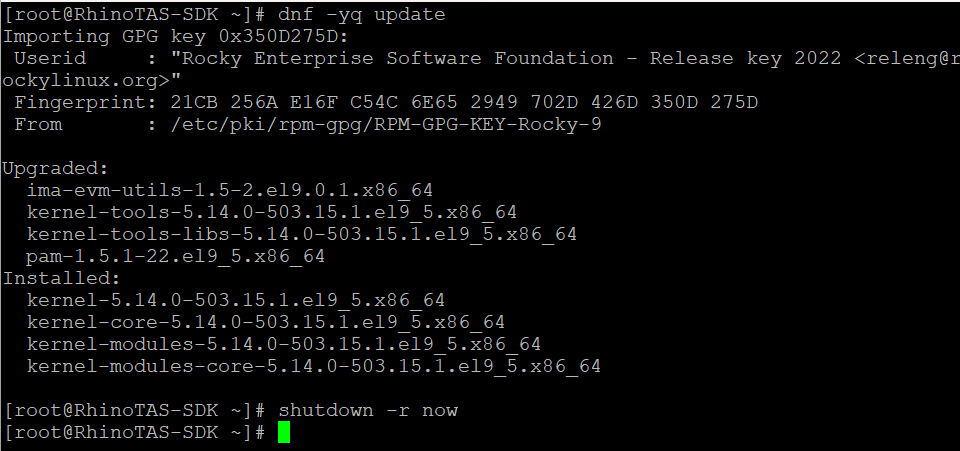
-
Install OpenJDK 17.
dnf -qy install java-17-openjdk-devel
-
Install the unzip utility.
dnf -qy install unzip
-
Install the tcpdump utility.
dnf -qy install tcpdump
Creating the rhino-tas User Account
Systems administrators often find themselves building lab systems to hand off to software engineers, application administrators, or other IT professionals. Without clear guidance, these systems can vary widely in configuration, leading to unexpected issues down the line.
Although the Rhino TAS SDK documentation doesn’t explicitly mention it, best practices strongly recommend deploying software under a dedicated, unprivileged user account. Installing it under the root user or, even worse, a personal login account—sometimes mistakenly done—can lead to significant security and operational risks, particularly during the rushed process of deleting login accounts when an employee separates from the company.
-
Create a
rhino-tasuser account with a home directory to house and execute the Rhino TAS software.useradd -r -m -d /usr/local/rhino-tas -s /bin/bash -c "Rhino TAS Service Account" rhino-tas
-
In professional software packaging, service accounts are given an unusable shell, such as /usr/sbin/nologin. Metaswitch, however, distributes their software as a ZIP file, bypassing the full packaging process and proper daemonization. Given this, and the practical need for on-the-ground operational work and troubleshooting, assigning the interactive shell is a reasonable tradeoff. Locking the account discourages password-based access, mitigating the risk.
Lock the
rhino-tasuser account.passwd -l rhino-tas
Preparing the User’s Java Environment
-
Switch to the rhino-tas user account.
su - rhino-tas
-
Setting JAVA_HOME to /usr/lib/jvm/java-17-openjdk ensures the Rhino-TAS shell environment remains stable and survives minor upgrades by leveraging the JDK package’s symbolic links, which automatically point to the correct version. This approach avoids the risks of hard-coded versions, preventing the environment variable from becoming outdated or pointing to a non-existent location during updates.
Update
~/.bashrc.echo "export JAVA_HOME=/usr/lib/jvm/java-17-openjdk" >> ~/.bashrc echo "export PATH=\$JAVA_HOME/bin:\$PATH" >> ~/.bashrc
Apply the changes.
source ~/.bashrc
Note: The Rhino TAS SDK auto-generates its configuration file on first startup, capturing the current value of JAVA_HOME at that time. As a result, simply updating JAVA_HOME in the shell environment won’t change the JDK used by the SDK.
Note: The recommendation in the Rhino SDK Getting Started Guide to update ~/.profile is not suitable for bash-based systems and will typically not work as expected.
Installing Rhino TAS Software to the User Environment
Perform these steps, also, as the rhino-tas user, situated in the rhino-tas user’s home directory.
-
Download the installer files from https://docs.rhino.metaswitch.com/ocdoc/books/devportal-downloads/1.0/downloads-index/
You need three things:
- Rhino TAS SDK installer
- SIP Resource Adapter
- REM Standalone Version
-
Transfer the archives to the server and place to the rhino-tas user account’s home directory.
ls -l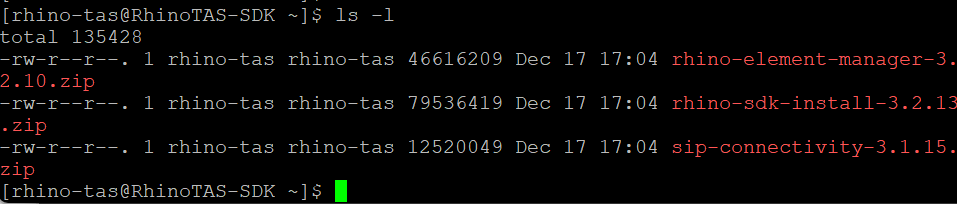
Note: If you’re transferring software files to a server, it’s often easiest to first download them to your desktop. Then, use a file transfer tool like WinSCP or FileZilla to upload the files via SFTP or SCP. Upload them initially to a directory where you have write access, such as your home directory or the
/tmpdirectory. Afterward, you can SSH into the server, elevate to root, and use commands likemvandchownto move the ZIP files into the~rhino-tasdirectory and ensure proper ownership.Alternatively, you can download the ZIP files directly to the server using command-line tools like
lynx(which may need to be installed). Unlikewgetorcurl,lynxis recommended because the Metaswitch download site requires you to interactively accept a license agreement, making direct download links elusive. -
Unzip the Rhino TAS SDK installer
unzip -q rhino-sdk-install-3.2.13.zip
unzip -q sip-connectivity-3.1.15.zip -d RhinoSDK/
-
cd into the RhinoSDK directory
cd RhinoSDK/
-
Start the service.
./start-rhino.sh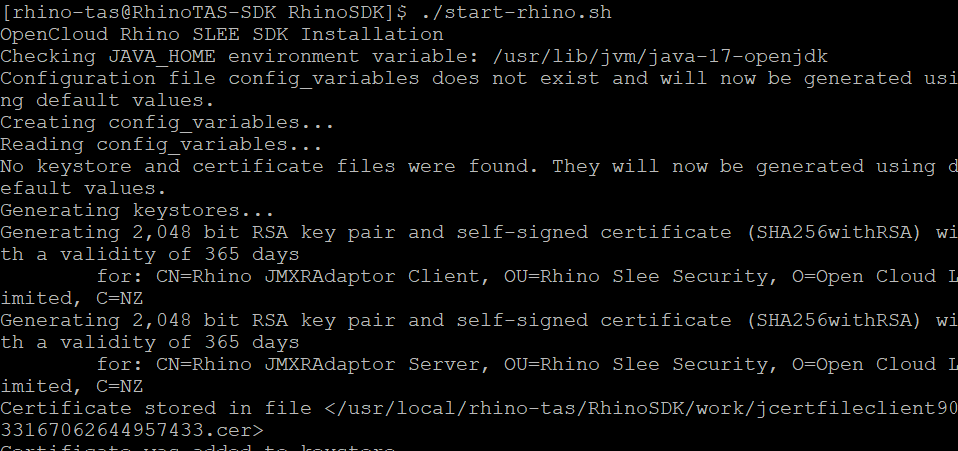
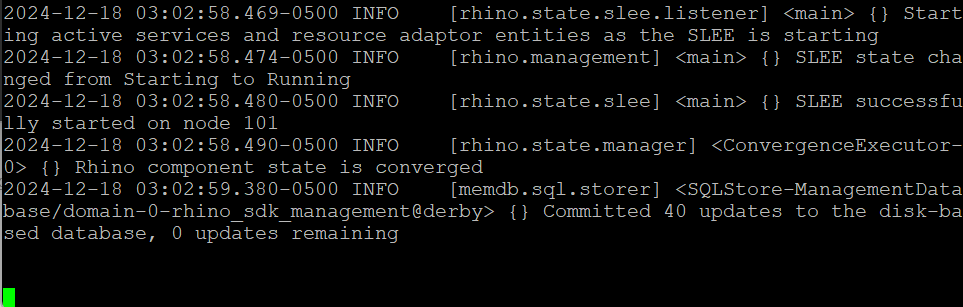
Note: The startup will produce pages of output, and once the service is fully initialized this will show.
-
Open a duplicate SSH session and, again, become the rhino-tas user.
cd into the RhinoSDK directory
cd RhinoSDK/ -
Drill down two more directories into the cd rhino-connectivity/sip-3.1.15/ directory
cd rhino-connectivity/sip-3.1.15/
Note: You must navigate to this specific directory because the deployexamples.sh script relies on relative path names for its internal commands. This makes the current working directory (CWD) at the time of script execution critical for proper functionality. Skipping this step will result in errors.
-
Edit the sip.properties file to specify a SIP domain name for use in your lab.
sed -i 's/^PROXY_DOMAINS=.*/PROXY_DOMAINS=lab4.decoursey.com/' sip.properties
Note: The sed one-liner is clearer to demonstrate, or use a text editor of your choice.
-
Execute the deployexamples script
./deployexamples.sh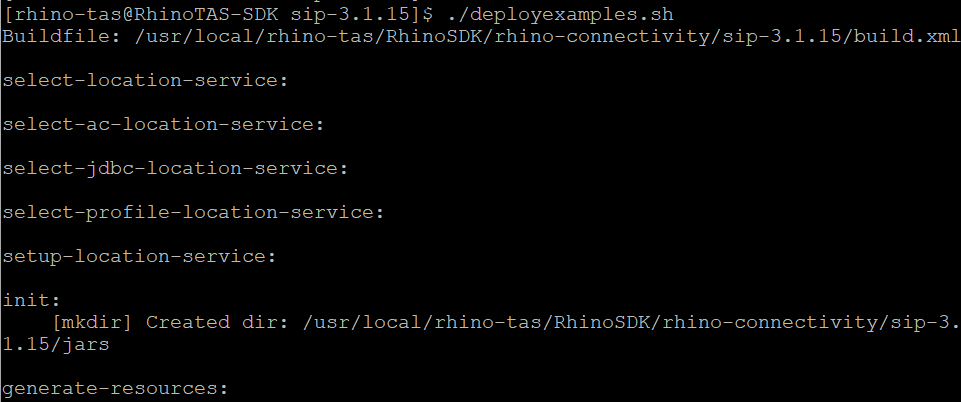
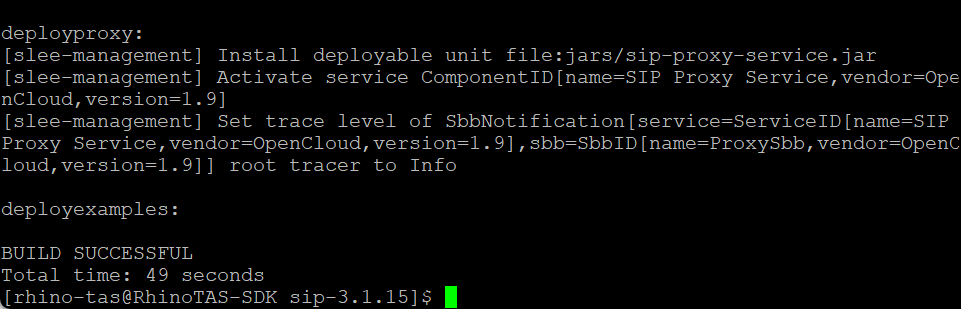
Note: this goes on for pages. It’s done when the prompt returns. Should end like this:
Rhino Element Manager
The Rhino TAS SDK does not provide an administrative web UI, but REM (Rhino Element Manager) is a separate component. While its direct relevance to our PoC is unclear, getting it running and connected provides useful familiarity with the platform.
Even if the system is typically managed through other mechanisms, having an admin web UI available can be invaluable when urgent, workaround-type changes are needed outside of normal processes. This sort of flexibility often proves necessary, even when the tool isn’t initially critical to the project.
Using the embedded version would have required downgrading the whole project to JDK 11, so I opted for a standalone setup.
This will be a quick look, and we won’t be bulletproofing the setup since REM won’t be in the call path.
-
Retrieve the file
~rhino-tas/RhinoSDK/rhino-trust.certfrom the server and make it available on your desktop PC.This file contains the self-signed server certificate generated during the initial startup of the Rhino TAS SDK. REM enforces HTTPS certificate validation for its connection to Rhino TAS SDK, so this certificate must be imported into REM’s trust store via its web UI.
The file is in DER (Distinguished Encoding Rules) format, a binary format commonly used for storing X.509 certificates. To transfer it, use a tool like WinSCP or FileZilla, as DER files cannot be copied through the clipboard like PEM format. If you’re curious about its details, you can inspect the certificate using the following command:
openssl x509 -inform DER -in rhino-trust.cert -text -noout -
Retrieve the Rhino TAS SDK password by running the following command:
grep ^rhino.remote.password ~rhino-tas/RhinoSDK/client/etc/client.properties
This password was randomly generated during the initial startup of the Rhino TAS SDK and is used to authenticate REM (the external web UI) with the Rhino TAS SDK backend. Once retrieved, you’ll need to supply this password to REM to establish the connection.
-
Unzip the REM software.
unzip -q rhino-element-manager-3.2.10.zip
-
cd into the REM directory.
cd rhino-element-manager-3.2.10
-
Execute the rem.sh script.
./rem.sh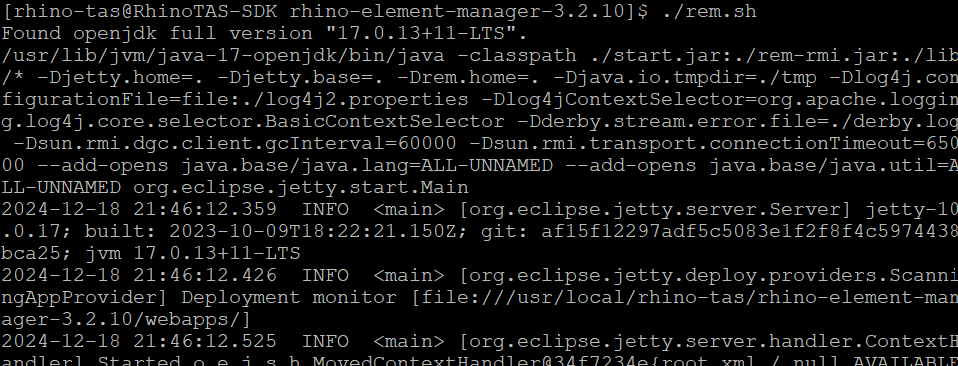
-
Navigate to
http://RhinoTAS-SDK:8080/remin your desktop web browser. u: emadm p: passwordNote: Substitute the IP address or (if resolvable) hostname of the server where you’re installing Rhino TAS SDK.
-
Once logged into the REM admin web UI, select Edit Element Manager Users and Roles and set a secure password for both the “emadm” user as well as for the “user” user. Document your new passwords. Do not leave the default passwords.
-
Once logged into the REM admin web UI, select Edit Rhino Instances, click on the “Local” instance, and use the “+” button under Server Cert to upload the server certificate.
-
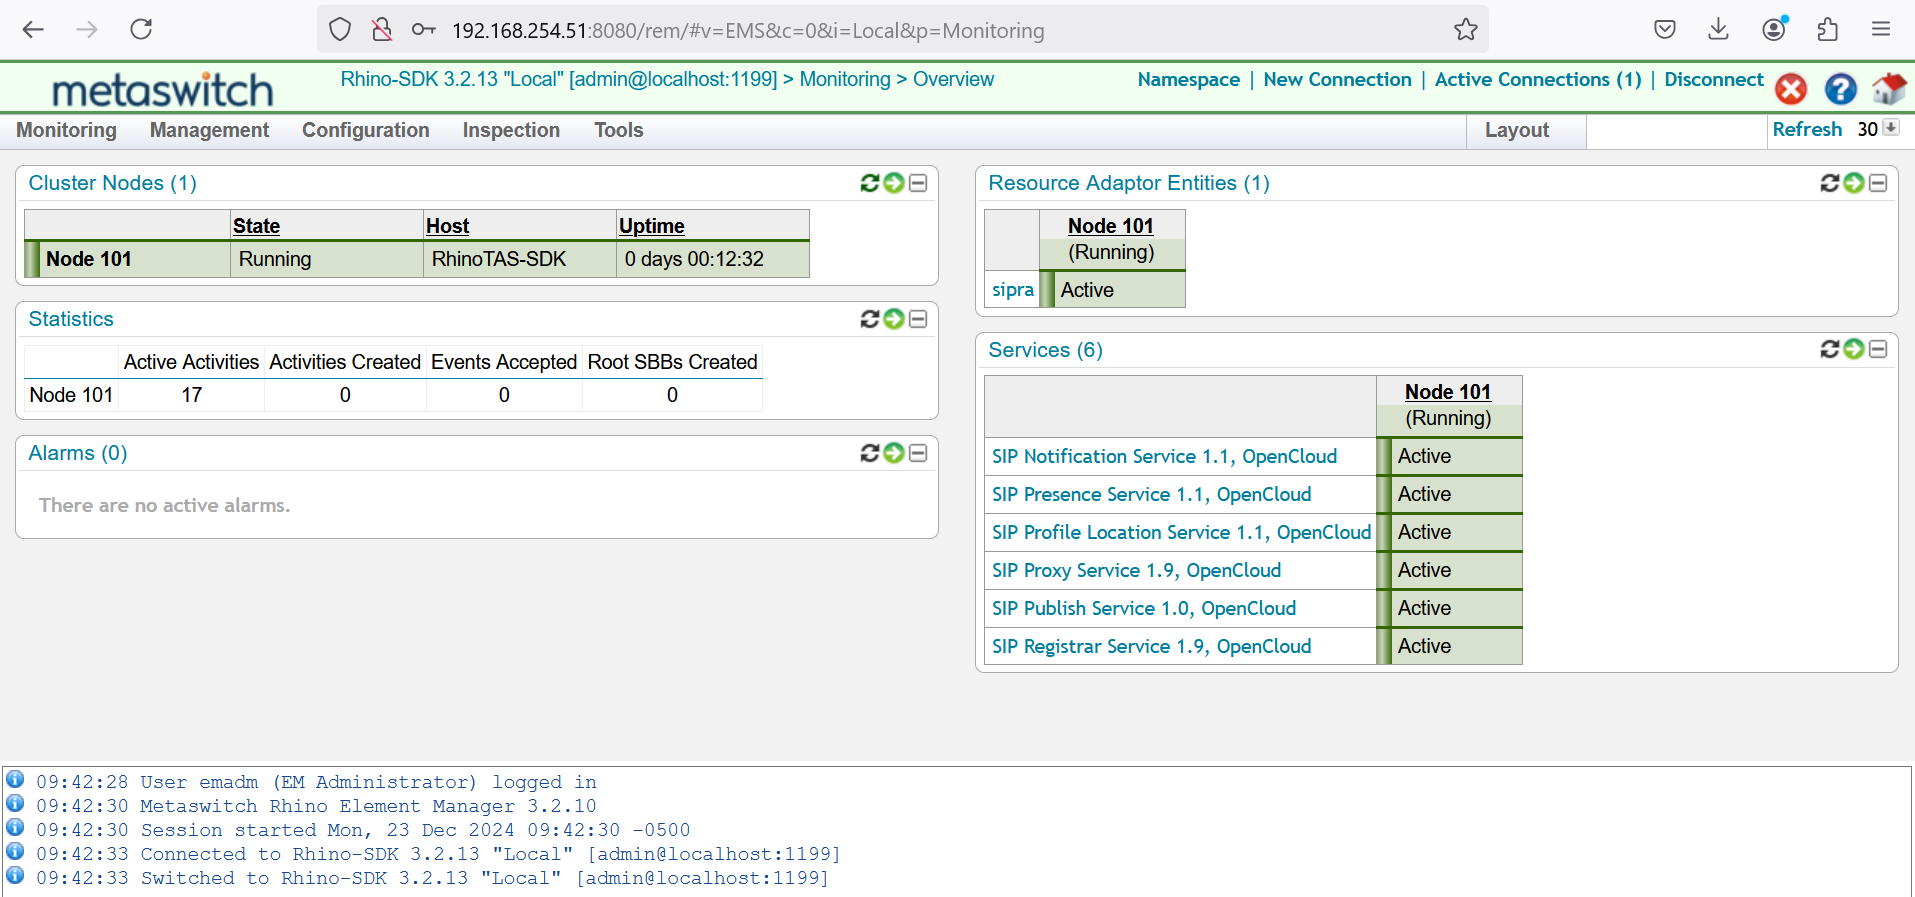
Navigate back to the REM main menu for example by clicking the home icon at the top right of the interface. From here, select Manage a Rhino Element. Select Connect To: and then Local. Use the option to edit the saved admin credential and supply the password obtained from step 2 above. Now, retry the Local connetion, which should succeed.
Testing and Validation of the Rhino TAS Install
Spoiler Upfront: As it turns out, the Rhino TAS platform supports logging, but the sample SIP applications I’m using for my lab do not. These applications also lack endpoints for exposing metrics. While I had initially aimed to showcase log analysis, monitoring and alerting as a key part of this project, I’ve had to adjust my approach. My new plan is to deliver monitoring and alerting as a separate deep-dive project.
Testing Focus:
Registration Verification: Can we successfully register soft phones?
Call Placement: Can we place test calls?
Unfortunately, I can’t showcase my log analysis skills with these samples, as they neither log registration nor calls. However, this isn’t a major issue for the platform itself, as the sample applications are not intended for actual use. Any operator using the platform would develop their applications and incorporate necessary logging and metrics.
Setting up to monitor the registration attempt.
-
The Rhino TAS SDK’s main log file is
RhinoSDK/work/log/rhino.log. Let’s open a new SSH connection and start tailing the log file so that we’ll see immediately once there is activity.cd RhinoSDK/work/log
tail -f rhino.log
Note: The tail command displays the last few lines of a text file. The -f option keeps the command running, updating the display with new lines as they are added to the file in real time. This process, called “tailing,” continues until you press [CTRL]-[C] to stop it. For system administrators, tail -f is an essential tool for monitoring live log file activity, making it easier to diagnose issues as they occur.
-
Let’s get a couple more sessions open to the server and, as root, start some packet captures so that once the registration attempt appears on the network, we’ll see real time.
First, we’ll use tshark (the CLI version of Wireshark) to do a realtime decoding of SIP traffic and dump the analysis to the terminal.
tshark -i enp0s3 -f "host 192.168.254.12 and port 5060" -Y "sip" -O sip -V
Second, we’ll simultaneously use tcpdump (in yet another root shell) to get a raw pcap. This permits later offline analysis e.g. using the GUI version of Wireshark, or for sharing with a vendor or partner support or with a customer to request help or to illustrate your point.
tcpdump -i enp0s3 -s0 -w Dec20-0405pm.pcap
Note: Packet capture is a key troubleshooting tool, usually used when diagnosing issues. The tshark command works well for live analysis on the server, giving immediate visibility into SIP traffic. A full pcap is better for doing offline analysis after replicating issues, or sharing with a partner, vendor, or customer for help. If you plan to share the capture, ensure sensitive information is avoided or removed. In this case, I’m setting up the pcap ahead of time to show how it’s done. The IP address 192.168.254.12 is the host where I’ll run the first softphone.
Testing the registration service.
-
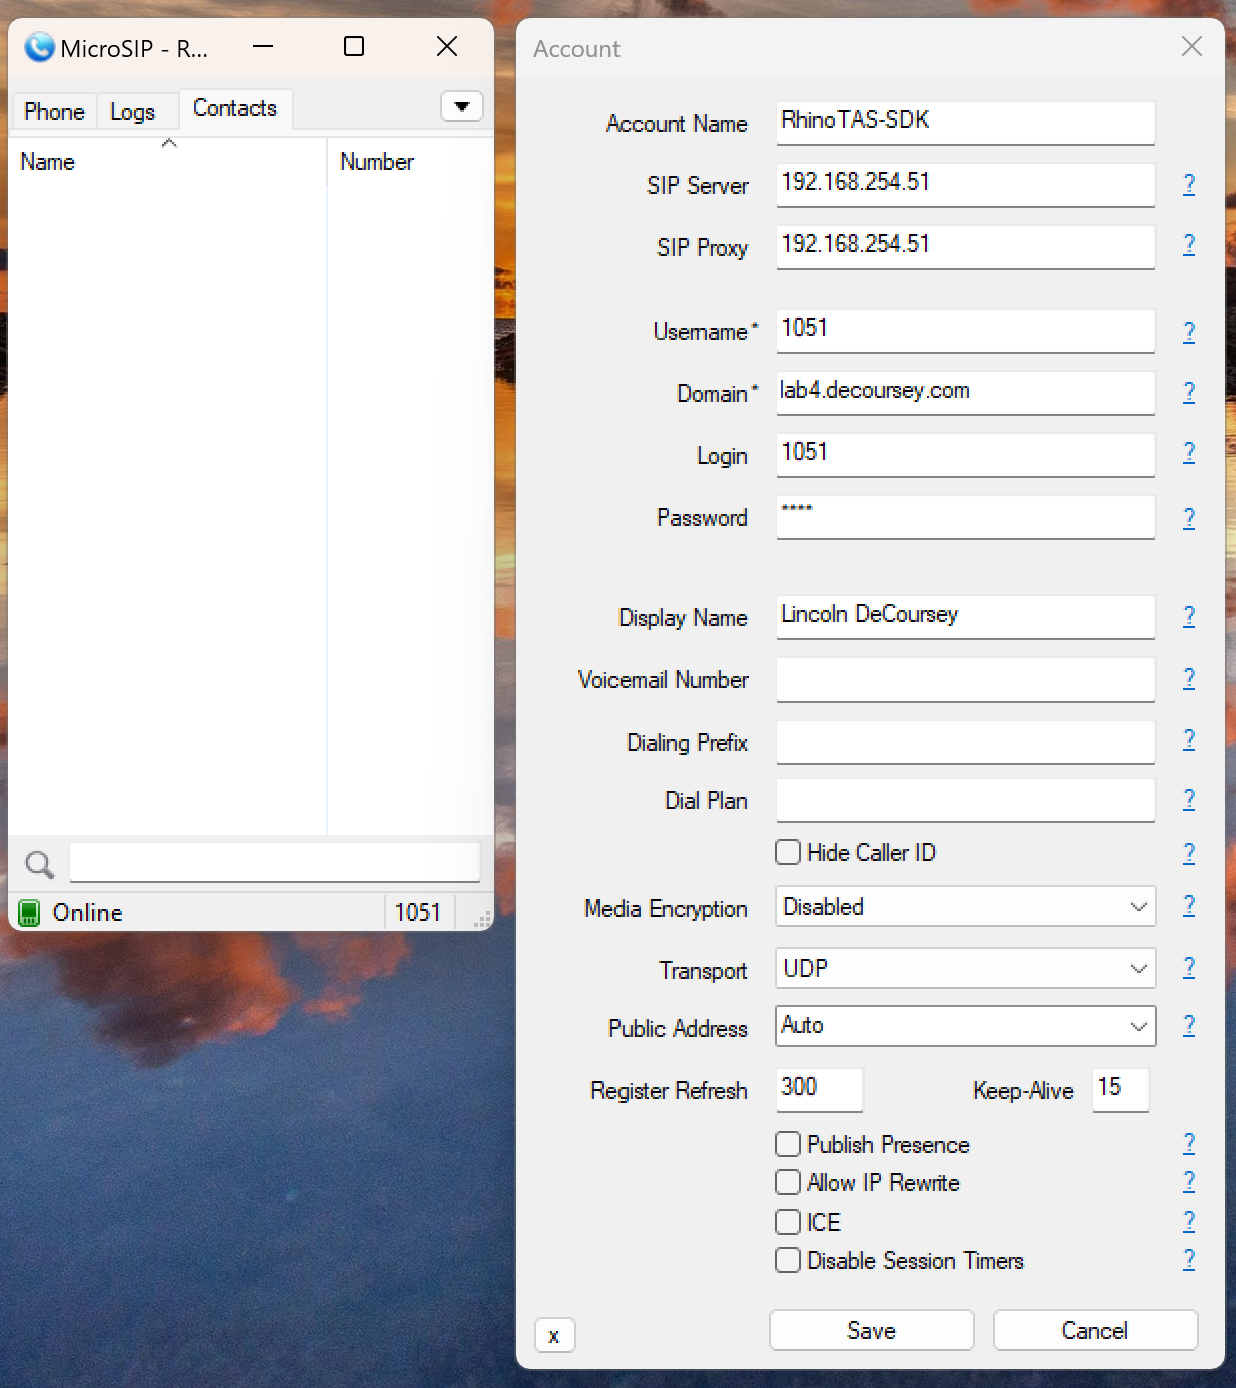
Let’s try registering from a softphone client application. I will use MicroSIP.
-
My tshark packet trace session comes alive with this detail.
Frame 556: 605 bytes on wire (4840 bits), 605 bytes captured (4840 bits)
Ethernet II, Src: Chongqin_11:42:5f (8c:c8:4b:11:42:5f), Dst: PcsCompu_0e:6e:65 (08:00:27:0e:6e:65)
Internet Protocol Version 4, Src: 192.168.254.12, Dst: 192.168.254.51
User Datagram Protocol, Src Port: 59000, Dst Port: 5060
Session Initiation Protocol (REGISTER)
    Request-Line: REGISTER sip:192.168.254.51 SIP/2.0
        Method: REGISTER
        Request-URI: sip:192.168.254.51
            Request-URI Host Part: 192.168.254.51
        [Resent Packet: False]
    Message Header
        Via: SIP/2.0/UDP 192.168.254.12:59000;rport;branch=z9hG4bKPj4c75b6e28e1949cd97d27a5022f94541
            Transport: UDP
            Sent-by Address: 192.168.254.12
            Sent-by port: 59000
            RPort: rport
            Branch: z9hG4bKPj4c75b6e28e1949cd97d27a5022f94541
        Route: <sip:192.168.254.51;lr>
            Route URI: sip:192.168.254.51;lr
                Route Host Part: 192.168.254.51
                Route URI parameter: lr
        Max-Forwards: 70
        From: <sip:[email protected]>;tag=bbf84b96e8334f678d44bc05366381ef
            SIP from address: sip:[email protected]
                SIP from address User Part: 1051
                SIP from address Host Part: lab4.decoursey.com
            SIP from tag: bbf84b96e8334f678d44bc05366381ef
        To: <sip:[email protected]>
            SIP to address: sip:[email protected]
                SIP to address User Part: 1051
                SIP to address Host Part: lab4.decoursey.com
        Call-ID: eb8da9f55e3d43bd8d29f48365424ca9
        [Generated Call-ID: eb8da9f55e3d43bd8d29f48365424ca9]
        CSeq: 19789 REGISTER
            Sequence Number: 19789
            Method: REGISTER
        User-Agent: MicroSIP/3.21.5
        Contact: <sip:[email protected]:59000;ob>
            Contact URI: sip:[email protected]:59000;ob
                Contact URI User Part: 1051
                Contact URI Host Part: 192.168.254.12
                Contact URI Host Port: 59000
                Contact URI parameter: ob
        Expires: 300
        Allow: PRACK, INVITE, ACK, BYE, CANCEL, UPDATE, INFO, SUBSCRIBE, NOTIFY, REFER, MESSAGE, OPTIONS
        Content-Length:  0

Frame 559: 453 bytes on wire (3624 bits), 453 bytes captured (3624 bits)
Ethernet II, Src: PcsCompu_0e:6e:65 (08:00:27:0e:6e:65), Dst: Chongqin_11:42:5f (8c:c8:4b:11:42:5f)
Internet Protocol Version 4, Src: 192.168.254.51, Dst: 192.168.254.12
User Datagram Protocol, Src Port: 5060, Dst Port: 59000
Session Initiation Protocol (200)
    Status-Line: SIP/2.0 200 OK
        Status-Code: 200
        [Resent Packet: False]
        [Request Frame: 556]
        [Response Time (ms): 234]
    Message Header
        Via: SIP/2.0/UDP 192.168.254.12:59000;rport=59000;branch=z9hG4bKPj4c75b6e28e1949cd97d27a5022f94541
            Transport: UDP
            Sent-by Address: 192.168.254.12
            Sent-by port: 59000
            RPort: 59000
            Branch: z9hG4bKPj4c75b6e28e1949cd97d27a5022f94541
        From: <sip:[email protected]>;tag=bbf84b96e8334f678d44bc05366381ef
            SIP from address: sip:[email protected]
                SIP from address User Part: 1051
                SIP from address Host Part: lab4.decoursey.com
            SIP from tag: bbf84b96e8334f678d44bc05366381ef
        To: <sip:[email protected]>
            SIP to address: sip:[email protected]
                SIP to address User Part: 1051
                SIP to address Host Part: lab4.decoursey.com
        Call-ID: eb8da9f55e3d43bd8d29f48365424ca9
        [Generated Call-ID: eb8da9f55e3d43bd8d29f48365424ca9]
        CSeq: 19789 REGISTER
            Sequence Number: 19789
            Method: REGISTER
        Contact: <sip:[email protected]:59000;ob>;expires=300;q=0.0
            Contact URI: sip:[email protected]:59000;ob
                Contact URI User Part: 1051
                Contact URI Host Part: 192.168.254.12
                Contact URI Host Port: 59000
                Contact URI parameter: ob
            Contact parameter: expires=300
            Contact parameter: q=0.0
        Date: Fri, 20 Dec 2024 21:30:53 GMT
        Content-Length: 0
This is a successful SIP registration. The system allowed registration without any configuration for the user or extension. Keep in mind, this is a sample application designed to help developers get started with SIP. Authentication is not implemented to keep the setup simple for initial development.
The source code for the registration functionality can be found in the file RhinoSDK/rhino-connectivity/sip-3.1.15/src/com/opencloud/slee/services/sip/registrar/RegistrarSbb.java. There is a placeholder comment where authentication and authorization would be added.
Note: The registration process typically follows a challenge-response strategy. The client sends a REGISTER request without credentials, and the server responds with a 401 Unauthorized message, prompting the client to provide the correct credentials. Seeing the 401 Unauthorized response is normal and simply indicates the server is prompting for credentials.
Error observed in the platform logs
Recall I was tailing the log file during the registration process. I did notice an error.
2024-12-21 02:30:18.812-0500 Warning [trace.sipra.sip.fail] <sipra/IO/0> {} incoming message from /192.168.254.12:57898 rejected: parse failed, drop message
message buffer contents:

java.text.ParseException: no character matching rule token found at current index, buf=""
         at com.opencloud.slee.resources.sip.parser.Lexer.makeParseException(Lexer.java:799)
         at com.opencloud.slee.resources.sip.parser.Lexer.getCharacterSequence(Lexer.java:777)
         at com.opencloud.slee.resources.sip.parser.Lexer.getCharacterSequence(Lexer.java:742)
         at com.opencloud.slee.resources.sip.parser.Lexer.getNextToken(Lexer.java:630)
         at com.opencloud.slee.resources.sip.parser.SipParser.parseFirstLine(SipParser.java:345)
         at com.opencloud.slee.resources.sip.parser.SipParser.parseFirstLine(SipParser.java:241)
         at com.opencloud.slee.resources.sip.transport.handler.SipMessageDecoder.decodeStep(SipMessageDecoder.java:137)
         at com.opencloud.slee.resources.sip.transport.handler.SipMessageDecoder.decode(SipMessageDecoder.java:105)
         at io.netty.handler.codec.ByteToMessageDecoder.decodeRemovalReentryProtection(ByteToMessageDecoder.java:529)            at io.netty.handler.codec.ByteToMessageDecoder.callDecode(ByteToMessageDecoder.java:468)
         at io.netty.handler.codec.ByteToMessageDecoder.channelRead(ByteToMessageDecoder.java:290)
         at io.netty.channel.AbstractChannelHandlerContext.invokeChannelRead(AbstractChannelHandlerContext.java:444)
         at io.netty.channel.AbstractChannelHandlerContext.invokeChannelRead(AbstractChannelHandlerContext.java:420)
         at io.netty.channel.AbstractChannelHandlerContext.fireChannelRead(AbstractChannelHandlerContext.java:412)
         at com.opencloud.slee.resources.sip.transport.handler.NetworkEventHandler.channelRead(NetworkEventHandler.java:155)
[ ... snipped for brevity ... ]
This is a Java stack trace, which is a standardized format for error messages in Java applications. Stack traces are human-readable to some extent and often provide clues as to what went wrong. In this case, it appears that the server encountered an issue while trying to parse a SIP message, indicating that the message was invalid.
Stack traces are especially useful because they usually include the filename and line number from the source code where the error occurred. If you have access to the source code, this can be extremely helpful for troubleshooting. When analyzing a stack trace, start from the top.
The registration was successful, which suggests a benign (noise) error — one that appears in the logs but doesn’t affect normal usage. From tailing the logs in real time, it was clear that the error occurred about every 15 seconds, which didn’t even align with the registration interval, but rather aligned with the keep-alives. This pointed to the error being caused by MicroSIP not properly formatting the keep-alive packets. Even though these packets don’t need to be processed by the server — they’re only meant to maintain the network path through stateful firewalls or NAT gateways — more care should have been taken in their implementation. It appears to be a minor bug on the MicroSIP side, causing invalid requests.
My solution was to disable the keep-alives and reduce the registration interval to 120 seconds, which should be plenty frequent enough to keep the connection alive.
Testing the proxy service
In setting up for the test call, I have again started packet captures. This time, I am doing simultaneous packet capture on the PBX server as well as on the callee’s machine, covering the duration of the test call.
tcpdump -i enp0s3 -s0 -w Dec21-0409pm.pcap

Note: When using tcpdump on Linux, including a file extension like .pcap is good practice. Though not required by Linux, it ensures the file is easily recognizable and opens correctly in tools like Wireshark on other systems. Without the extension, the file might need to be opened manually or renamed for proper recognition.
I have registered two soft phones: ext. 1050 is situated on 192.168.254.52 and ext. 1051 situated on 192.168.254.12.
The Rhino PBX SDK server is 192.168.254.51.
The test will involve ext. 1050 calling ext. 1051.
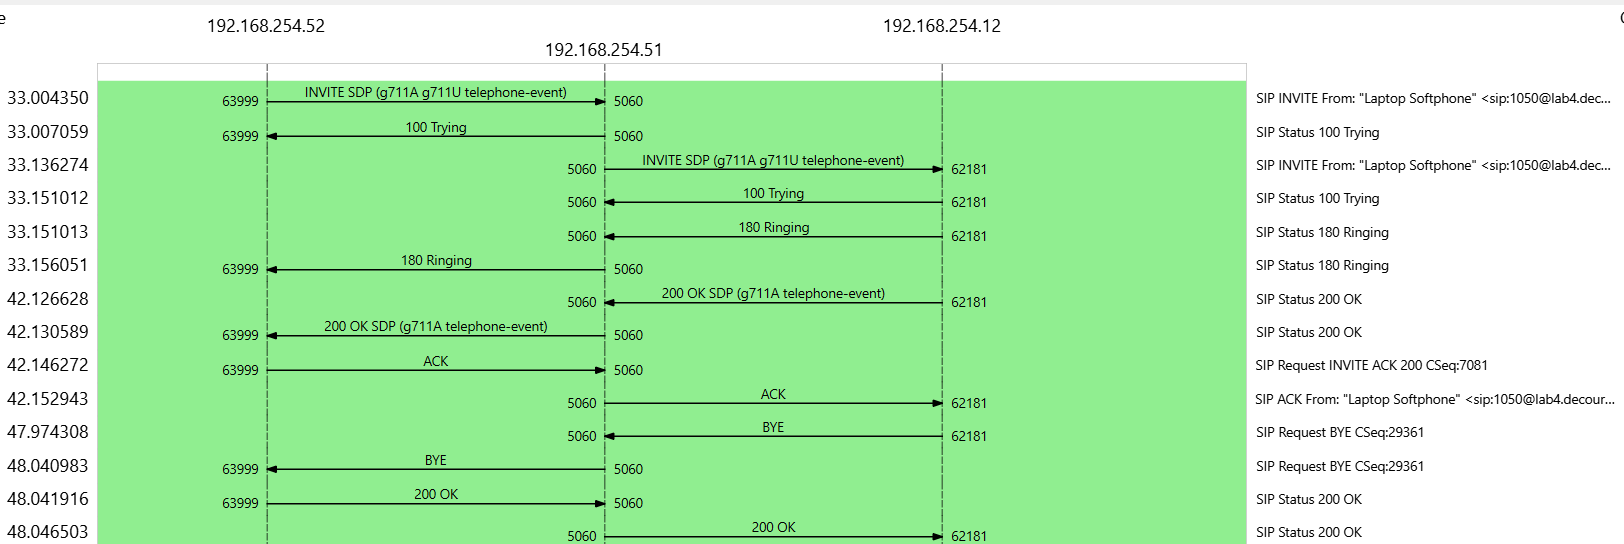
The packet capture taken during the test call reveals the dual nature of the call flow from the PBX’s perspective. Positioned as the middlebox, the PBX handles both the inbound leg from the caller and the outbound leg toward the callee in a unified manner.
The SIP protocol governs the signaling phase of this communication. In this exercise, I captured the full handshake sequence, showcasing both the SIP INVITE and its corresponding 200 OK responses from each leg of the call.
The INVITE Process
Here’s the INVITE from the caller’s softphone to the PBX:
INVITE sip:[email protected] SIP/2.0
Via: SIP/2.0/UDP 192.168.254.52:63999;rport;branch=z9hG4bKPjad86691ceb7f487983238fe4d8da55b0
From: "Laptop Softphone" <sip:[email protected]>;tag=e778c0943dee4a86a1dac5cd95729d32
To: <sip:[email protected]>
Contact: "Laptop Softphone" <sip:[email protected]:63999;ob>
Call-ID: 7111c5ccb078431d94b2fa1ddc3f1c7a
CSeq: 7081 INVITE
Content-Type: application/sdp
Content-Length: 346

v=0
o=- 3943786649 3943786649 IN IP4 192.168.254.52
s=pjmedia
c=IN IP4 192.168.254.52
t=0 0
m=audio 4010 RTP/AVP 8 0 101
a=rtpmap:8 PCMA/8000
a=rtpmap:0 PCMU/8000
a=rtpmap:101 telephone-event/8000
a=fmtp:101 0-16
a=sendrecv
The PBX processes and relays the INVITE to the callee:
INVITE sip:[email protected]:62181;ob SIP/2.0
Via: SIP/2.0/UDP 192.168.254.51:5060;branch=z9hG4bKa246d7f899643f59a1937bd5941b1e73;rport
From: "Laptop Softphone" <sip:[email protected]>;tag=e778c0943dee4a86a1dac5cd95729d32
To: <sip:[email protected]>
Contact: "Laptop Softphone" <sip:[email protected]:63999;ob>
Call-ID: 7111c5ccb078431d94b2fa1ddc3f1c7a
CSeq: 7081 INVITE
Record-Route: <sip:192.168.254.51:5060;transport=UDP;lr>
Content-Type: application/sdp
Content-Length: 346

v=0
o=- 3943786649 3943786649 IN IP4 192.168.254.52
s=pjmedia
c=IN IP4 192.168.254.52
t=0 0
m=audio 4010 RTP/AVP 8 0 101
a=rtpmap:8 PCMA/8000
a=rtpmap:0 PCMU/8000
a=rtpmap:101 telephone-event/8000
a=fmtp:101 0-16
a=sendrecv
The 200 OK Responses
The callee responds with a 200 OK:
SIP/2.0 200 OK
Via: SIP/2.0/UDP 192.168.254.51:5060;branch=z9hG4bKa246d7f899643f59a1937bd5941b1e73;rport
From: "Laptop Softphone" <sip:[email protected]>;tag=e778c0943dee4a86a1dac5cd95729d32
To: <sip:[email protected]>;tag=e12935090f894164886200e94f61a828
Call-ID: 7111c5ccb078431d94b2fa1ddc3f1c7a
CSeq: 7081 INVITE
Contact: <sip:[email protected]:62181;ob>
Content-Type: application/sdp
Content-Length: 321

v=0
o=- 3943786647 3943786648 IN IP4 192.168.254.12
s=pjmedia
c=IN IP4 192.168.254.12
t=0 0
m=audio 4018 RTP/AVP 8 101
a=rtpmap:8 PCMA/8000
a=rtpmap:101 telephone-event/8000
a=fmtp:101 0-16
a=sendrecv
The PBX forwards the 200 OK back to the caller:
SIP/2.0 200 OK
Via: SIP/2.0/UDP 192.168.254.52:63999;branch=z9hG4bKPjad86691ceb7f487983238fe4d8da55b0;rport
From: "Laptop Softphone" <sip:[email protected]>;tag=e778c0943dee4a86a1dac5cd95729d32
To: <sip:[email protected]>;tag=e12935090f894164886200e94f61a828
Call-ID: 7111c5ccb078431d94b2fa1ddc3f1c7a
CSeq: 7081 INVITE
Contact: <sip:[email protected]:62181;ob>
Content-Type: application/sdp
Content-Length: 321

v=0
o=- 3943786647 3943786648 IN IP4 192.168.254.12
s=pjmedia
c=IN IP4 192.168.254.12
t=0 0
m=audio 4018 RTP/AVP 8 101
a=rtpmap:8 PCMA/8000
a=rtpmap:101 telephone-event/8000
a=fmtp:101 0-16
a=sendrecv
Media Stream Prediction
The 200 OK response is more than just an acknowledgment; it also informs the caller about where and how to set up the media stream. Specifically, the SDP in the 200 OK indicates the callee’s media connection details:
- Media IP: 192.168.254.12
- Media Port: 4018
Given this, we predict the RTP stream from the caller to the callee will originate from 192.168.254.52:4010 and terminate at 192.168.254.12:4018. In the reverse direction, the RTP stream will start at 192.168.254.12:4018 and end at 192.168.254.52:4010.
Validating with Callee’s PCAP
Using the callee’s packet capture to analyze RTP streams:
lincoln@DESKTOP-LINCOLN:~$ tshark -r callee.pcapng -q -z rtp,streams
========================= RTP Streams ========================
   Start time      End time     Src IP addr  Port    Dest IP addr  Port       SSRC          Payload  Pkts         Lost   Min Delta(ms)  Mean Delta(ms)   Max Delta(ms)  Min Jitter(ms) Mean Jitter(ms)  Max Jitter(ms) Problems?
    29.685967     35.505983  192.168.254.12  4018  192.168.254.52  4010 0x2CD504B0            g711A   292     0 (0.0%)           9.838          20.000          30.307           0.004           1.312           3.256
    29.681122     35.581229  192.168.254.52  4010  192.168.254.12  4018 0x4B7129E9            g711A   296     0 (0.0%)          11.710          20.000          28.212           0.014           0.388           1.507
==============================================================
lincoln@DESKTOP-LINCOLN:~$
As predicted, the RTP streams flow directly between the endpoints without PBX intervention, confirming the separation of signaling and media typical in SIP.
The PBX’s role as a signaling intermediary is evident in its use of Record-Route headers and relaying of SIP messages. However, it does not act as a media proxy; the RTP flows directly between endpoints. This separation of signaling and media, characteristic of SIP, underscores its efficiency in network resource usage.
Conclusion
Reflecting on this project, I am eager to bring my skills and experience to a team committed to operational excellence. The challenges of ensuring system reliability and delivering seamless service are ones I approach with respect and enthusiasm. I look forward to stepping into a role where I can contribute to building robust, well-monitored systems that support the highest standards of performance and reliability.
This proof-of-concept lab underscores my proactive mindset and readiness to engage with the real-world complexities of systems administration. While I know there is always more to learn, I am excited by the opportunity to grow alongside a team that values precision, stability, and continuous improvement.
My focus is on delivering excellence—leveraging my skills in monitoring, troubleshooting, and maintaining critical infrastructure, while embracing new challenges with humility and determination. I am eager to collaborate, learn, and contribute to ensuring the success of the systems and the people who rely on them. Together, we can tackle the demands of this ever-evolving field and achieve outstanding results.