Custom Monitoring with Net-SNMP and SolarWinds Universal Device Pollers
Background
Early in my career, I was on the front lines in a new war against spam email. The problem was challenging and largely unsolved. Few players were in the market, and success was measured by simply having any solution, even if it wasn’t stable or fully polished. Customers tolerated “war stories” of failures because the focus was on solving the problem at all.
Over time, as the spam problem became more solvable, the industry matured, and expectations rose. A shake-out occurred, where companies that couldn’t execute well were left behind. Larger players (e.g., big tech) consolidated the leaders, bundling spam filtering as part of broader offerings. This commoditization negatively impacted smaller, independent players.
While consolidation can be bad news for mid-sized companies, it also creates opportunities. Big tech tends to bundle “good enough” solutions, leaving space for smaller companies to compete with niche, best-in-class offerings that target customers seeking premium solutions.
Overview
As it turns out, best in class is about more than feature set. Features need to be backed up by solid execution. Big tech sets a high bar; they have tons of resources to dedicate to site reliability.
Key Risks
- Customer-Discovered Outages: Being unaware of your own outage and failing to promptly spin up on it is a problem. When you self-discover an outage early, you have a chance to engage with it so that your customer doesn’t have to. If your customer is forced to call your hotline, it’s hard to avoid the perception that you’re asleep at the switch.
- Timeline Analysis: Once the customer reports the issue, the first thing they will demand is “when did this start?” You will have to go back through your logs and detail records to isolate the start of the incident, and it’s this incident start time—not the time that you became aware of the issue—that will form the basis of the Incident Timeline included in the post-outage write-up.
- Executive Visibility: Outages reach the highest levels of scrutiny within an organization. Root Cause Analysis (RCA) and Reason For Outage (RFO) write-ups are reviewed by top leadership, both within your company and at the customer side. Seemingly little things like allowing a few hours to slip between customer updates—even if you are working the issue diligently—become big questions in an escalated incident review, providing ammunition for a narrative to be crafted against you and impacting the perceived handling of the incident.
- SLA Impact: Service Level Agreements (SLAs) often include penalty clauses for downtime. Delayed detection means logging significant downtime, which can lead to financial penalties with no chance for recovery.
- Customer Churn and Reputational Damage: Inadequate monitoring leading to undetected outages can severely damage your organization’s reputation. Customers lose trust and confidence when they feel their service provider is unstable. This erosion of trust can impact referenceability and result in increased customer churn.
Aspects of a Successful Monitoring Operation
- Aim for Excellence: Monitoring is like any other aspect of a product launch—it involves detailed work to discover requirements, build solutions, and validate their effectiveness. To achieve excellence, monitoring must be embedded in the project, not treated as an afterthought. This requires participating in project teams on equal footing, ensuring monitoring is planned and implemented collaboratively with input from all stakeholders.
- Technical Acumen: Monitoring requires a wide array of insights and skills, spanning collaboration, problem-solving, and strategic thinking. However, at its core, it demands deep technical expertise. The metrics being asked for aren’t easy to reach, and there’s no pre-canned integration to them—otherwise, they would have been collected already.
- Stack Deep Dive: Total failures are relatively easy to catch, but silent failures—subtle issues that don’t cause outright crashes—can be just as damaging. These problems often degrade performance gradually, creating a complex mess once discovered. Consider scenarios like one system in a cluster running an outdated configuration or calls silently taking a PSTN failover path for weeks, resulting in unexpected costs. These issues often hide in the details—replicated configurations, middleware communications, or subtle misconfigurations.
- Continuous Improvement: Conducting postmortems after every incident to discuss what worked, what didn’t, and where there’s room for improvement is essential. Beyond these formal reviews, always stay vigilant for conversations and clues where enhanced monitoring could make a difference. Be the monitoring and alerting champion, proactively offering improvements even when others might not see the opportunity.
- Follow Through: Improvements are often identified during customer escalations and promised as part of resolving support engagements. However, once an engagement is closed, the customer may let the issue drop, leading to less accountability for delivering on the promise. To prevent this, it’s vital to demonstrate end-to-end ownership and ensure all commitments are met.
- Art Not Science / Balancing Act: Creating monitoring alerts involves a delicate balance. You’re writing code that could wake someone up in the middle of the night, so it’s not always about adding more alerts—it’s about refining and sometimes subtracting. Always seek feedback to distinguish what is useful from what is noise. Sometimes, criteria like an unusual absence of volume might be necessary to catch issues, but you need to adjust for false positives. Some alerts are crucial but don’t require 24/7 paging. Remember, your first responders are your closest business partners; respect their work-life balance and ensure critical alerts aren’t lost in a flood of unnecessary ones.
Simple Network Management Protocol
SNMP, a protocol developed for managing devices, originated in the late 1980s through a collaborative effort involving multiple institutions.
SNMP supports both pull (GET) and push (TRAP) modes of signaling, making it highly versatile for a wide range of monitoring needs. Major hardware vendors have standardized around SNMP, effectively compelling its adoption for monitoring network equipment. While network vendors often provide their own proprietary solutions, these are typically closed systems, and SNMP remains the common denominator for interoperability. Due to this widespread standardization, SNMP has become a must-implement protocol in traditional IT environments, offering the unique ability to monitor every part of a network infrastructure. Despite the robust competition from platform-specific agents designed for Windows and Linux servers, SNMP’s universal applicability ensures its continued relevance as the single least common denominator in network monitoring.
Introduction to Net-SNMP and snmpd
Net-SNMP is the most prominent implementation of SNMP agents and tools for UNIX and Linux environments. Its roots trace back to the CMU SNMP project, developed at Carnegie Mellon University. Building on this foundation, significant development occurred at UC Davis, where the project transitioned into what we now know as Net-SNMP. Wes Hardaker played a pivotal role during this phase, overseeing substantial refinements and expansions that transformed it into a robust suite, including the widely used snmpd agent. By the early 2000s, Net-SNMP had firmly established itself as a leading implementation, synonymous with SNMP on Linux systems.
Net-SNMP is available for all major Linux distributions. I already chose Debian for the SBCs because FreeSWITCH prefers this distribution. I’ll install Net-SNMP on the Debian-based SBCs alongside FreeSWITCH for custom monitoring.
Enable additional repositories (optional)
The snmp-mibs-downloader package is part of the non-free repository because it downloads non-open source Management Information Base (MIB) files. Net-SNMP itself is free, and while we may or may not use the MIBs in our exercise, it’s beneficial to install the MIBs together with the user tools. MIBs are a useful aid to SNMP software, but there is no hard requirement to use them.
# Configure the contrib and non-free repos
sed -i 's/main/main contrib non-free/' /etc/apt/sources.list
# Update the package list
apt-get update
Install the software
apt install snmpd snmp smitools snmp-mibs-downloader
Configuring SNMP Agent for Non-Localhost Connections
It’s typical for server software to ship with a default localhost-only configuration as a safety measure to ensure the services are only externally reachable once you intend them to be.
To expose the SNMP agent (daemon) to non-localhost connections, you need to edit the /etc/snmp/snmpd.conf configuration file. Adjust the agentaddress line to specify the desired IP addresses.
Considerations:
- Binding to All Interfaces:
- To bind the SNMP agent to all interfaces, specify
0.0.0.0as the IP address. This is the most common configuration.
agentaddress 0.0.0.0 - To bind the SNMP agent to all interfaces, specify
- Binding to a Specific IP Address:
- If you prefer to bind to a specific IP address, you can do so. However, note that if the system’s IP address changes (e.g., via DHCP or manual re-IP), the SNMP agent will fail to start.
- It’s recommended to keep
127.0.0.1in the list to allow localhost connections.
agentaddress 127.0.0.1,192.168.252.221 - Security Considerations:
- On multi-homed systems connected to SIP Trunk networks, ensure that SNMP and SSH are not exposed to business partners. These protocols are intended for internal management only.
Configuring SNMP Community Strings and Access
To avoid frustrations during your project work, it’s crucial to address authentication and permissions from the beginning. While you can get basic SNMP queries working out of the box, more advanced tasks require proper access configuration.
Default Configuration:
The default SNMP configuration restricts the public community string to a systemonly view:
view   systemonly  included   .1.3.6.1.2.1.1
view   systemonly  included   .1.3.6.1.2.1.25.1
rocommunity  public default -V systemonly
rocommunity6 public default -V systemonly
rouser authPrivUser authpriv -V systemonly
To access more than just the systemonly view, you need to create a new view and reconfigure the public community string.
Steps to Reconfigure the Public Community String for Read-Only All Access:
- Define the “all” View:
- Edit the
/etc/snmp/snmpd.conffile to include a new view that encompasses everything.
view all included .1 - Edit the
- Reconfigure the Public Community String:
- Modify the community string to use the new
allview.
rocommunity public default -V all - Modify the community string to use the new
- Restart the SNMP Service:
- After making the changes, restart the SNMP service to apply the new configuration.
sudo systemctl restart snmpd
Security Considerations:
- For the scope of this project, I will use SNMPv2c for simplicity, avoiding the additional complexity of SNMPv3.
- Be cautious with the
publiccommunity string. In a production environment, it’s recommended to use a non-default community string or SNMPv3 for better security. - While SNMP was originally designed to allow both monitoring and configuration (using the SET method), it is primarily used for monitoring. For this project, I recommend configuring SNMP for read-only access.
Your First SNMP Walk
To begin interacting with your SNMP agent, you can use the snmpwalk command. This command allows you to query a range of information from the SNMP agent, providing a detailed view of the system’s status and configuration.
In the example below, we use the head command to display only the first few lines of output to keep it brief for the sake of the write-up. As you can see from the line count, there are over 5,000 lines of output.
root@LA-SBC:/etc/snmp# snmpwalk -v2c -c public localhost | head -n 5
iso.3.6.1.2.1.1.1.0 = STRING: "Linux LA-SBC 5.10.0-33-amd64 #1 SMP Debian 5.10.226-1 (2024-10-03) x86_64"
iso.3.6.1.2.1.1.2.0 = OID: iso.3.6.1.4.1.8072.3.2.10
iso.3.6.1.2.1.1.3.0 = Timeticks: (6913) 0:01:09.13
iso.3.6.1.2.1.1.4.0 = STRING: "Me <[email protected]>"
iso.3.6.1.2.1.1.5.0 = STRING: "LA-SBC"
root@LA-SBC:/etc/snmp#
root@LA-SBC:/etc/snmp#
root@LA-SBC:/etc/snmp# snmpwalk -v2c -c public localhost | wc -l
5588
root@LA-SBC:/etc/snmp#
Extending Net-SNMP Agent with Custom Metrics
When it comes to extending the Net-SNMP agent with custom metrics, there are several approaches you can take. Here we’ll discuss these options, starting with MIB Modules:
MIB Modules
MIB Modules are essentially the standard way of exposing data through Net-SNMP. They represent the full integration pathway used to collect and expose metrics such as NIC, filesystem, and other core Linux metrics. Here are some key points about MIB Modules:
- Language and Integration: MIB modules are generally written in the C programming language, which allows for close-to-the-metal performance and fine-grained control. These modules are compiled and then loaded by the Net-SNMP agent.
- Usage and Documentation: There is extensive documentation provided by Net-SNMP on how to write, compile, and integrate these modules. This method is highly detailed and customizable, making it suitable for complex and large-scale integrations.
- Typical Use Cases: Given the level of complexity and the integration effort required, this approach is often adopted by major hardware manufacturers or large organizations that need to integrate comprehensive monitoring capabilities across their products or infrastructure.
- Overkill for Customizations: For localized customizations or simpler monitoring needs, MIB Modules are overkill. They require significant development resources and expertise in C programming.
In summary, while MIB Modules provide a powerful and flexible way to extend Net-SNMP, they are beyond the needs of smaller projects.
AgentX
AgentX is a protocol for delegating parts of the SNMP OID address space to sub-agents, enabling distributed management of SNMP metrics. It is:
- A standard approach for mature software projects to expose SNMP metrics. Before building custom solutions, check whether the software you need to monitor already supports SNMP via AgentX.
- A powerful tool for developing custom metrics, particularly when other SNMP extension mechanisms (e.g.,
extend,pass, orpass_persist) are insufficient. However, using AgentX for custom extensions is considered an advanced undertaking.
Below are additional considerations:
- Zero-Config Delegation: AgentX enables nearly zero-configuration delegation of OID ranges to sub-agents via a Linux socket file or configurable UDP/TCP communication.
- Custom Sub-Agents: If extending Net-SNMP through simpler mechanisms today, consider AgentX as your next step. Middleware solutions, such as those built with Python, can extract, transform, and manage metrics programmatically while integrating with AgentX.
Ownership and Permissions
Proper ownership and permissions for the AgentX socket file are critical for successful integration:
- Ensure your application has write access to the socket file. Below is an example
snmpd.confconfiguration that sets group ownership and write permissions for the groupfreeswitch(the group under which our sub-agent runs). - Note the execute bit (
x) is set on the directory, including for others. In UNIX, directory execute permissions allow traversal, which is essential.
Example snmpd.conf Configuration
# Set up AgentX socket with group ownership and permissions
agentXSocket /var/agentx/master agentXPerms 0770 0711 root freeswitch
pass_persist
The pass_persist directive in Net-SNMP offers a dynamic and flexible way to handle SNMP data by delegating control of a specific OID subtree to an external script. Here’s what you need to know:
- Requires Developing a Script: The
pass_persistprotocol requires developing a script that can speak the Net-SNMP pass_persist protocol. Your script must handle more than just simple lookups; it must navigate the OID tree using SNMP semantics, responding togetandgetnextrequests, and maintain control over the subtree. This is essential for dynamic metrics, especially in tabular format. - Learning Opportunity: This hands-on approach provides a valuable learning experience: it forces you to understand and implement the SNMP protocol’s semantics yourself.
- UNIX inetd Concept: This approach is similar to the UNIX
inetdconcept, which allows the implementation of network services merely by interfacing with standard input and output. - Most Accessible Method:
pass_persistis the most accessible method for delegating portions of the OID tree to a sub-agent, which is critical for adding new metrics without needing to update thesnmpdconfiguration. - Strategic Middle Ground: This method is ideal for those requiring precise control over which OIDs are used and how the hierarchy is defined. It allows for true space delegation, enabling dynamic metric data shipping without revisiting snmpd configuration for each individual metric.
Example snmpd.conf Configuration:
pass_persist .1.3.6.1.4.1.2021.255 /path/to/your_script.py
In this example, the pass_persist directive assigns the OID subtree rooted at .1.3.6.1.4.1.2021.255 to the specified script. This script is now responsible for handling all SNMP requests within that subtree.
extend
The extend directive in Net-SNMP is a straightforward method to integrate custom metrics into the SNMP agent, allowing you to extend its capabilities. Here’s what you need to know:
- Good for Unsupported Metrics: The
extenddirective is ideal for when a metric is not directly supported by SNMP but can be retrieved and printed out via a command-line shell script. - Simple Implementation: Unlike more complex methods such as
pass_persistor MIB Modules, theextenddirective is relatively simple to implement. You just need to specify the command to be executed. - Limited Control and Flexibility: Each custom metric must be individually specified in the
snmpd.conffile, and you don’t get to customize the entire OID, only the final part of it. - Generally Adequate: This method is best suited for exporting a few well-established, stable custom metrics that do not have dynamic or frequently changing requirements.
Example snmpd.conf Configuration:
# Extend SNMP with custom script
extend myCustomScript /path/to/my_script.sh
In this example, the extend directive assigns the script located at /path/to/my_script.sh to the identifier myCustomScript. The SNMP agent will execute this script whenever an SNMP request is made to that identifier.
The full OID will be structured as:
.1.3.6.1.4.1.8072.2.3.1.1.[index]
where [index] is a unique identifier for each extend instance. For example, if myCustomScript is the first instance, the OID might be:
.1.3.6.1.4.1.8072.2.3.1.1.1
Understanding Tabular Data in SNMP
The concept of tabular data in SNMP began with RFC 1066 (Aug 1988), laying the groundwork for structuring managed objects with tables. RFC 1213 (Mar 1991), expanded these definitions in MIB-II, providing a comprehensive framework for network management. Additionally, RFC 1155 (May 1990), known as SMI (Structure of Management Information), formalized the structure of management information, contributing to the standardization of tabular data in SNMP.
These RFCs collectively established the foundation for using tabular data in SNMP.
The Logical Structure of SNMP Tables
At the core of an SNMP table is its base OID, which identifies the table itself. Columns within the table are further defined as offsets from this base OID, and each row is indexed by a unique identifier appended to these column-specific OIDs. For example, in the ifTable (interface table) defined in the IF-MIB, we see:
- Base OID:
.1.3.6.1.2.1.2.2.1 - Column OIDs: Each column has a specific suffix, such as
.1forifIndex,.2forifDescr,.7forifAdminStatus, etc. - Row Indexing: Rows are identified by appending a row index to the column OID, e.g.,
.1.3.6.1.2.1.2.2.1.2.1refers to theifDescr(description) of the first interface.
This hierarchical structure is key to navigating SNMP tables programmatically and visually.
Visualizing the Hierarchy
The following example from an SNMP walk demonstrates the canonical structure of the ifTable, focusing on three key columns: ifIndex (index), ifDescr (description), and ifAdminStatus (administrative status).
SNMP Walk Output:
.1.3.6.1.2.1.2.2.1.1.1 = INTEGER: 1
.1.3.6.1.2.1.2.2.1.1.2 = INTEGER: 2
.1.3.6.1.2.1.2.2.1.2.1 = STRING: lo
.1.3.6.1.2.1.2.2.1.2.2 = STRING: Red Hat, Inc. Device 0001
.1.3.6.1.2.1.2.2.1.7.1 = INTEGER: up(1)
.1.3.6.1.2.1.2.2.1.7.2 = INTEGER: up(1)
Breaking this down:
- Base OID:
.1.3.6.1.2.1.2.2.1 - Columns:
.1(ifIndex) identifies the interface..2(ifDescr) provides a textual description of the interface..7(ifAdminStatus) indicates whether the interface is administratively up or down.
- Rows: The index at the end (e.g.,
1,2) corresponds to a specific interface.
Tabular Representation:
| Index (.1) | Description (.2) | Admin Status (.7) |
|---|---|---|
| 1 | lo | up (1) |
| 2 | Red Hat, Inc. Device 0001 | up (1) |
Key Takeaways
- Established Standards: The structure of SNMP tables follows standards defined in RFCs and MIBs, ensuring predictable and consistent data access.
- Hierarchical Mapping: Base OIDs anchor tables, while column and row indices extend these anchors to form a complete data path.
Application to Modern Monitoring
Modern monitoring platforms leverage this hierarchical SNMP model to automatically discover and integrate system resources, both at initial deployment and over time. This dynamic discovery is crucial for ensuring continuous and accurate monitoring, as it eliminates the need for manual configuration updates when systems change.
For example:
- Scenario 1: A new filesystem is created on a server. The monitoring platform should automatically detect the addition of the filesystem and begin applying the correct monitoring policies (e.g., disk space usage, inode usage).
- Scenario 2: A new network interface card (NIC) is added. The system should detect the NIC, fetch its status, and monitor traffic accordingly.
Proof of Concept: Custom Metrics Integration
Building on insights from my initial exploration of Net-SNMP, I am now set to embark on a proof of concept (PoC) for integrating custom metrics into and through Net-SNMP to SolarWinds.
Choosing an extension mechanism: pass_persist
When evaluating ways to extend Net-SNMP with custom metrics, I chose the pass_persist option. It provides the necessary control over the OID space, supports hierarchical structures for tables, and allows dynamic updates to items without requiring changes to the snmpd configuration.
Initial Considerations
The main challenge is developing a script that adheres to SNMP semantics. To address this, I’ll begin with a prototyping approach, focusing on establishing a reliable method for passing data to Net-SNMP. Using dummy data in the initial phase ensures the framework is solid and minimizes the risk of wasted effort from false starts.
Prototyping with Dummy Data
Prototyping is a practical strategy when requirements are evolving or unclear. In this case, I need to integrate custom metrics into Net-SNMP while preparing for future SolarWinds integration. Given the uncertainty and investigative nature of the SolarWinds phase, prototyping ensures flexibility and minimizes wasted effort if I have to circle back. It also helps to break the problem into manageable chunks, allowing me to start with minimal effort and adapt as needed.
To prototype effectively, I’ll use the filesystem as a simple storage backend. This decision allows me to focus on two key tasks:
- Implementing the pass_persist Protocol: I’ll concentrate on refining the pass_persist protocol—writing, debugging, and iterating the script, with log files and packet captures guiding the process. The goal is to stabilize the script’s functionality, ensuring it can parse requests, navigate the tree structure, and respond appropriately with detailed logs for debugging.
- Mastering the OID Hierarchy for Tabular Data: Once the script is solid, attention will shift to optimizing the OID hierarchy. Using basic disk files enables rapid iteration on the data structure without disrupting the script’s stability, ensuring efficient experimentation with different hierarchies.
Ultimately, the entire approach is a prototype solution aimed at solidifying my methodology before deploying the actual custom metrics.
Implementing the pass_persist Protocol
The pass_persist directive in Net-SNMP is a powerful tool that delegates control over an OID subtree to an external script. Unlike the simpler pass, which executes a new script for each SNMP request, pass_persist keeps the script running continuously, reducing overhead and benefiting dynamic or frequently updated metrics.
A Bash Implementation
The following Bash script implements the pass_persist protocol. It dynamically traverses an OID tree and supports PING, get, getnext, and getbulk commands. Logs are written to /tmp/read_oid_persist.log for debugging purposes.
#!/bin/bash
LOG_FILE="/tmp/read_oid_persist.log"

echo "$(date) - Starting read_oid_persist.sh" >> "$LOG_FILE"

while true; do
    read CMD
    echo "$(date) - Command: $CMD" >> "$LOG_FILE"

    if [ "$CMD" == "PING" ]; then
        echo "PONG"
        echo "$(date) - Responding to PING with PONG" >> "$LOG_FILE"
    else
        read OID
        echo "$(date) - OID: $OID" >> "$LOG_FILE"

        if [ "$CMD" == "get" ]; then
            if [ -f "/oids/$OID" ]; then
                VALUE=$(cat "/oids/$OID")
                TYPE="STRING"
                if [[ "$VALUE" =~ ^[0-9]+$ ]]; then
                    TYPE="INTEGER"
                fi
                echo "$OID"
                echo "$TYPE"
                echo "$VALUE"
                echo "$(date) - Returning value: $VALUE for OID: $OID, Type: $TYPE" >> "$LOG_FILE"
            else
                echo "NONE"
                echo "$(date) - OID not found: $OID" >> "$LOG_FILE"
            fi
        elif [ "$CMD" == "getnext" ]; then
            NEXT_OID=$(ls -A /oids | grep -A 1 "^$OID\$" | tail -n 1)
            if [ -f "/oids/$NEXT_OID" ]; then
                VALUE=$(cat "/oids/$NEXT_OID")
                TYPE="STRING"
                if [[ "$VALUE" =~ ^[0-9]+$ ]]; then
                    TYPE="INTEGER"
                fi
                echo "$NEXT_OID"
                echo "$TYPE"
                echo "$VALUE"
                echo "$(date) - Returning next OID: $NEXT_OID with value: $VALUE, Type: $TYPE" >> "$LOG_FILE"
            else
                echo "NONE"
                echo "$(date) - Next OID not found after: $OID" >> "$LOG_FILE"
            fi
        elif [ "$CMD" == "getbulk" ]; then
            read NON_REPEATERS MAX_REPETITIONS
            RESULTS=()
            CURRENT_OID=$OID

            for (( i=0; i<$NON_REPEATERS; i++ )); do
                if [ -f "/oids/$CURRENT_OID" ]; then
                    VALUE=$(cat "/oids/$CURRENT_OID")
                    TYPE="STRING"
                    if [[ "$VALUE" =~ ^[0-9]+$ ]]; then
                        TYPE="INTEGER"
                    fi
                    RESULTS+=("$CURRENT_OID")
                    RESULTS+=("$TYPE")
                    RESULTS+=("$VALUE")
                fi
                CURRENT_OID=$(ls -A /oids | grep -A 1 "^$CURRENT_OID\$" | tail -n 1)
            done

            for (( i=0; i<$MAX_REPETITIONS; i++ )); do
                if [ -f "/oids/$CURRENT_OID" ]; then
                    VALUE=$(cat "/oids/$CURRENT_OID")
                    TYPE="STRING"
                    if [[ "$VALUE" =~ ^[0-9]+$ ]]; then
                        TYPE="INTEGER"
                    fi
                    RESULTS+=("$CURRENT_OID")
                    RESULTS+=("$TYPE")
                    RESULTS+=("$VALUE")
                fi
                CURRENT_OID=$(ls -A /oids | grep -A 1 "^$CURRENT_OID\$" | tail -n 1)
            done

            for RESULT in "${RESULTS[@]}"; do
                echo "$RESULT"
            done

            echo "$(date) - Returning bulk results for OID: $OID" >> "$LOG_FILE"
        else
            echo "NONE"
            echo "$(date) - Unknown command: $CMD" >> "$LOG_FILE"
        fi
    fi
done
Introducing the Dummy Data Script
This script uses plain disk files for SNMP responses, ensuring the data structure is self-documenting and easy to replicate. It allows for quick iterations and clear debugging, validating the pass_persist implementation without the need for live metrics.
#!/bin/bash

# --------------------------------------------------------------------
# SNMP Table Prototype Script: Gateway Status and Call Counts
#
# This script creates a single SNMP table with the following structure:
# - Base OID: .1.3.6.1.4.1.9999.10701.1 (gatewayTable)
# - Columns:
#     .1 -> gatewayIndex     (INTEGER: Index of the gateway)
#     .2 -> gatewayDescr     (STRING: Description of the gateway)
#     .3 -> gatewayStatus    (INTEGER: 1=UP, 2=DOWN)
#     .4 -> gatewayCalls     (INTEGER: Number of active calls)
#
# Data rows:
#   - Index 1: chi-sbc, UP, 23 calls
#   - Index 2: la-sbc, DOWN, 15 calls
#
# This layout mimics the structure of IF-MIB tables and ensures all anchor
# OIDs are explicitly created for proper operation with pass_persist.
# --------------------------------------------------------------------

# Step 1: Create the anchor for the table base OID
mkdir -p /oids
echo "gatewayTable" > /oids/.1.3.6.1.4.1.9999.10701.1

# --------------------------------------------------------------------
# Column Anchors
# --------------------------------------------------------------------
echo "gatewayIndex"     > /oids/.1.3.6.1.4.1.9999.10701.1.1
echo "gatewayDescr"     > /oids/.1.3.6.1.4.1.9999.10701.1.2
echo "gatewayStatus"    > /oids/.1.3.6.1.4.1.9999.10701.1.3
echo "gatewayCalls"     > /oids/.1.3.6.1.4.1.9999.10701.1.4

# --------------------------------------------------------------------
# Row Definitions
# --------------------------------------------------------------------

# Row 1: chi-sbc
echo "1"                > /oids/.1.3.6.1.4.1.9999.10701.1.1.1    # Row 1, Column 1 (Index)
echo "chi-sbc"          > /oids/.1.3.6.1.4.1.9999.10701.1.2.1    # Row 1, Column 2 (Description)
echo "1"                > /oids/.1.3.6.1.4.1.9999.10701.1.3.1    # Row 1, Column 3 (Status: UP)
echo "23"               > /oids/.1.3.6.1.4.1.9999.10701.1.4.1    # Row 1, Column 4 (Calls)

# Row 2: la-sbc
echo "2"                > /oids/.1.3.6.1.4.1.9999.10701.1.1.2    # Row 2, Column 1 (Index)
echo "la-sbc"           > /oids/.1.3.6.1.4.1.9999.10701.1.2.2    # Row 2, Column 2 (Description)
echo "2"                > /oids/.1.3.6.1.4.1.9999.10701.1.3.2    # Row 2, Column 3 (Status: DOWN)
echo "15"               > /oids/.1.3.6.1.4.1.9999.10701.1.4.2    # Row 2, Column 4 (Calls)

# Completion Message
echo "SNMP table structure created successfully."

# --------------------------------------------------------------------
# Notes:
# - This table uses OIDs under the private enterprise tree (1.3.6.1.4.1).
# - Example `snmpwalk` command for testing:
#   snmpwalk -v2c -c public localhost .1.3.6.1.4.1.9999.10701.1
# --------------------------------------------------------------------
Validating the pass_persist Implementation
A tremendous amount of developer testing went into this, involving hundreds of test invocations, detailed log analysis, and live packet captures. This was a rigorous process aimed at ensuring everything worked as expected across different scenarios.
The following section presents just the final validation steps, which confirm that the implementation is functioning as intended. Keep in mind, this is the culmination of extensive testing and iterative improvements.
Here’s the configured snmpd.conf line for the pass_persist directive:
root@NY-SBC:/# tail -n 1 /etc/snmp/snmpd.conf
pass_persist .1.3.6.1.4.1.9999.10701.1 /usr/bin/bash /usr/local/scripts/read_oid_persist.sh
root@NY-SBC:/#
Let’s try some SNMP walks of the whole table as well as each column:
root@NY-SBC:/#  snmpwalk -v2c -c public localhost .1.3.6.1.4.1.9999.10701.1
SNMPv2-SMI::enterprises.9999.10701.1.1 = STRING: "gatewayIndex"
SNMPv2-SMI::enterprises.9999.10701.1.1.1 = INTEGER: 1
SNMPv2-SMI::enterprises.9999.10701.1.1.2 = INTEGER: 2
SNMPv2-SMI::enterprises.9999.10701.1.2 = STRING: "gatewayDescr"
SNMPv2-SMI::enterprises.9999.10701.1.2.1 = STRING: "chi-sbc"
SNMPv2-SMI::enterprises.9999.10701.1.2.2 = STRING: "la-sbc"
SNMPv2-SMI::enterprises.9999.10701.1.3 = STRING: "gatewayStatus"
SNMPv2-SMI::enterprises.9999.10701.1.3.1 = INTEGER: 1
SNMPv2-SMI::enterprises.9999.10701.1.3.2 = INTEGER: 2
SNMPv2-SMI::enterprises.9999.10701.1.4 = STRING: "gatewayCalls"
SNMPv2-SMI::enterprises.9999.10701.1.4.1 = INTEGER: 23
SNMPv2-SMI::enterprises.9999.10701.1.4.2 = INTEGER: 15
root@NY-SBC:/#
root@NY-SBC:/#
root@NY-SBC:/#  snmpwalk -v2c -c public localhost .1.3.6.1.4.1.9999.10701.1.1
SNMPv2-SMI::enterprises.9999.10701.1.1.1 = INTEGER: 1
SNMPv2-SMI::enterprises.9999.10701.1.1.2 = INTEGER: 2
root@NY-SBC:/#
root@NY-SBC:/#
root@NY-SBC:/#  snmpwalk -v2c -c public localhost .1.3.6.1.4.1.9999.10701.1.2
SNMPv2-SMI::enterprises.9999.10701.1.2.1 = STRING: "chi-sbc"
SNMPv2-SMI::enterprises.9999.10701.1.2.2 = STRING: "la-sbc"
root@NY-SBC:/#
root@NY-SBC:/#  snmpwalk -v2c -c public localhost .1.3.6.1.4.1.9999.10701.1.3
SNMPv2-SMI::enterprises.9999.10701.1.3.1 = INTEGER: 1
SNMPv2-SMI::enterprises.9999.10701.1.3.2 = INTEGER: 2
root@NY-SBC:/#
root@NY-SBC:/#  snmpwalk -v2c -c public localhost .1.3.6.1.4.1.9999.10701.1.4
SNMPv2-SMI::enterprises.9999.10701.1.4.1 = INTEGER: 23
SNMPv2-SMI::enterprises.9999.10701.1.4.2 = INTEGER: 15
root@NY-SBC:/#
I also tried SNMP bulk walks, which correspond to the ‘GET TABLE’ idea we’ll eventually encounter in SolarWinds. These utilize a different mechanism at the SNMP protocol level and exercise a different code path in our pass_persist script:
root@NY-SBC:/# snmpbulkwalk -v2c -c public localhost .1.3.6.1.4.1.9999.10701.1
SNMPv2-SMI::enterprises.9999.10701.1.1 = STRING: "gatewayIndex"
SNMPv2-SMI::enterprises.9999.10701.1.1.1 = INTEGER: 1
SNMPv2-SMI::enterprises.9999.10701.1.1.2 = INTEGER: 2
SNMPv2-SMI::enterprises.9999.10701.1.2 = STRING: "gatewayDescr"
SNMPv2-SMI::enterprises.9999.10701.1.2.1 = STRING: "chi-sbc"
SNMPv2-SMI::enterprises.9999.10701.1.2.2 = STRING: "la-sbc"
SNMPv2-SMI::enterprises.9999.10701.1.3 = STRING: "gatewayStatus"
SNMPv2-SMI::enterprises.9999.10701.1.3.1 = INTEGER: 1
SNMPv2-SMI::enterprises.9999.10701.1.3.2 = INTEGER: 2
SNMPv2-SMI::enterprises.9999.10701.1.4 = STRING: "gatewayCalls"
SNMPv2-SMI::enterprises.9999.10701.1.4.1 = INTEGER: 23
SNMPv2-SMI::enterprises.9999.10701.1.4.2 = INTEGER: 15
root@NY-SBC:/#
root@NY-SBC:/# snmpbulkwalk -v2c -c public localhost .1.3.6.1.4.1.9999.10701.1.1
SNMPv2-SMI::enterprises.9999.10701.1.1.1 = INTEGER: 1
SNMPv2-SMI::enterprises.9999.10701.1.1.2 = INTEGER: 2
root@NY-SBC:/#
root@NY-SBC:/# snmpbulkwalk -v2c -c public localhost .1.3.6.1.4.1.9999.10701.1.2
SNMPv2-SMI::enterprises.9999.10701.1.2.1 = STRING: "chi-sbc"
SNMPv2-SMI::enterprises.9999.10701.1.2.2 = STRING: "la-sbc"
root@NY-SBC:/#
root@NY-SBC:/# snmpbulkwalk -v2c -c public localhost .1.3.6.1.4.1.9999.10701.1.3
SNMPv2-SMI::enterprises.9999.10701.1.3.1 = INTEGER: 1
SNMPv2-SMI::enterprises.9999.10701.1.3.2 = INTEGER: 2
root@NY-SBC:/#
Finally let’s try some random gets, walks, etc. against individual OIDs, just to see if we can uncover any issues:
root@NY-SBC:/# snmpbulkwalk -v2c -c public localhost .1.3.6.1.4.1.9999.10701.1.3.1
SNMPv2-SMI::enterprises.9999.10701.1.3.1 = INTEGER: 1
root@NY-SBC:/#
root@NY-SBC:/# snmpwalk -v2c -c public localhost .1.3.6.1.4.1.9999.10701.1.3.1
SNMPv2-SMI::enterprises.9999.10701.1.3.1 = INTEGER: 1
root@NY-SBC:/#
root@NY-SBC:/# snmpget -v2c -c public localhost .1.3.6.1.4.1.9999.10701.1.3.1
SNMPv2-SMI::enterprises.9999.10701.1.3.1 = INTEGER: 1
root@NY-SBC:/#
root@NY-SBC:/# snmpget -v2c -c public localhost .1.3.6.1.4.1.9999.10701.1.3.2
SNMPv2-SMI::enterprises.9999.10701.1.3.2 = INTEGER: 2
root@NY-SBC:/#
root@NY-SBC:/# snmpget -v2c -c public localhost .1.3.6.1.4.1.9999.10701.1.4.2
SNMPv2-SMI::enterprises.9999.10701.1.4.2 = INTEGER: 15
root@NY-SBC:/#
Integration with SolarWinds
As part of the integration process for monitoring custom metrics from the SBCs into SolarWinds, I utilized SolarWinds’ UnDP (Universal Device Poller) tool to import the necessary SNMP data. This approach enabled me to retrieve a variety of metrics, including the dynamic discovery of connected SIP trunks.
UnDP Tool Overview
The UnDP tool offers flexibility for importing custom SNMP data, yet neither it nor SolarWinds’ main web UI support importing custom MIB files. To add a custom MIB to the monitoring system, you must submit the MIB file through SolarWinds support channels. They will then package it into a fleet-wide “database update,” as there is no supported way to perform a custom MIB import independently.
For this project, I leveraged the tool’s existing capabilities to import table-based data from the SBC using the “GET TABLE” functionality. Although the UnDP tool allows the definition of custom metrics without a MIB definition, there are limitations when dealing with custom metrics not covered by an imported MIB.
Challenges and Solutions
One of the main challenges I encountered was the lack of granular control over table formatting and labeling when using the “GET TABLE” feature. The UnDP tool does not offer per-column formatting options, which impacted how the data was displayed in the SolarWinds UI. Despite this limitation, I was able to configure table imports and implement essential monitoring functions, such as a working test alert for trunk status changes.
Although the tool does not fully align with the SNMP community’s standard for tabular data, it still allows for column-at-once polling, providing a reasonable compromise. With further adjustments, such as refining metric labeling and adjusting the display format, these limitations can be addressed to enhance the overall integration.
Conclusion
This proof of concept (PoC) demonstrates the successful integration of custom SNMP metrics with SolarWinds, meeting the immediate need for monitoring SIP trunk statuses. While it does not yet showcase advanced dashboards or fully customized metric displays, it sets a solid foundation for future enhancements.
I am eager to further explore SolarWinds’ capabilities and refine the configuration to create a more robust and dynamic monitoring solution. Given the opportunity to join your team, I am committed to mastering SolarWinds and delivering a polished, comprehensive integration.
Screenshots
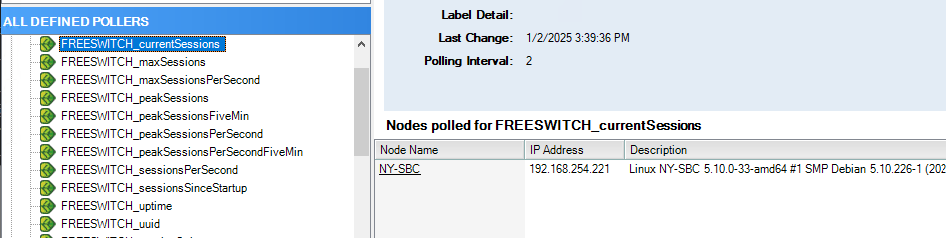
All of the stock FreeSWITCH metrics are being polled (scalars, via AgentX, but defined in UnDP).
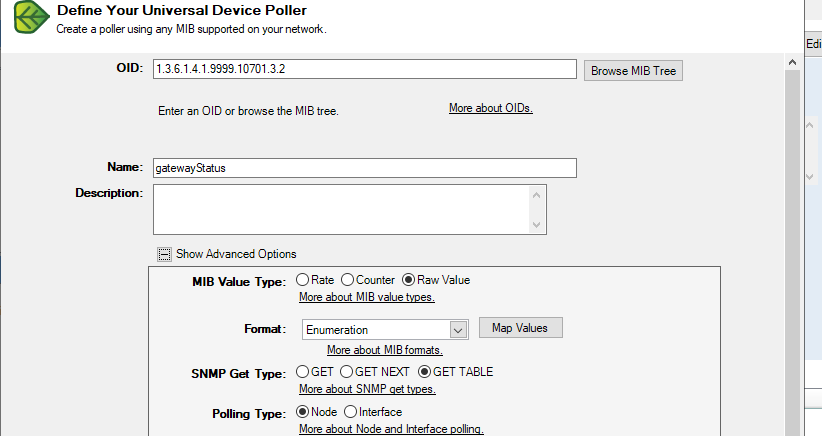
A sample of the tabular data imports via pass_persist, using column-at-once strategy (UnDP).
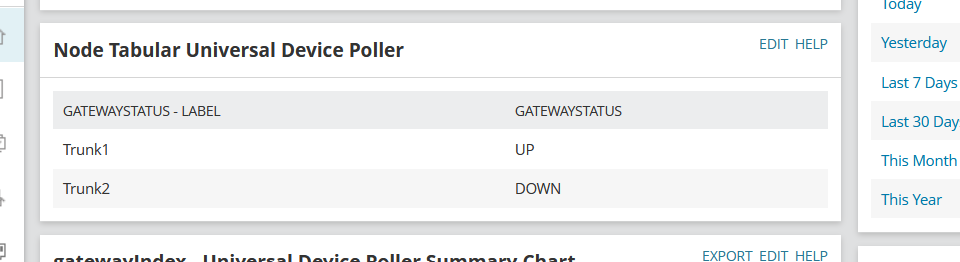
Status metric is successfully populating to SolarWinds UI as an actionable item, was able to define an alert around it.
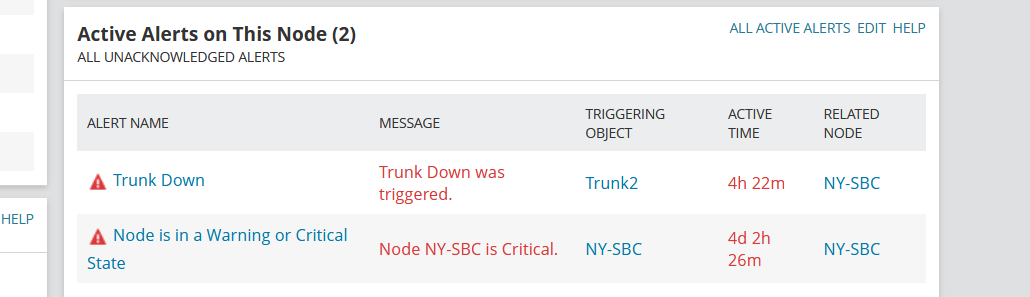
Successfully triggered the alert on SIP Trunk Down.
Final Chapter: Consolidating Lessons Learned and Delivering a Robust Solution
To complete the live custom metric implementation promised in the PoC, I needed to implement and plumb the actual live metric lookups from FreeSWITCH—swapping out the fake metrics for real ones.
I was thrilled with the simplicity of my prototype script, and that it actually worked. It was well-suited for the PoC, so I wanted to carry it forward as much as possible, in order to avoid introducing a lot of regressions.
How to tackle the redesign? I had the insight that the prototype back-end was implemented through the filesystem. I made a strategic decision to surgically modify the prototype script at the exact points where it interfaced with the filesystem, doing a 1:1 swap of the filesystem-targeting mechanism with a call-out to an external script that I would write to mimic the interface fully.
I identified three key mechanisms where my prototype pass_persist script was interacting with the filesystem: -z (does file exist) checks in conditional logic, ls -A (directory listing of OIDs), and cat (retrieval of values).
I also decided to do the refactor in two phases: in the first phase, I migrated the traversal/tree navigational aspects of the pass_persist script (e.g., does an OID exist, what is the “next” OID following this one) but left the actual metric retrieval logic targeting the dummy back-end. Once I had this aspect locked in and validated, I made a backup copy of my work and started on the live metric lookups as the final phase.
Here’s the final directory layout and the scripts in their complete form:
root@NY-SBC:/usr/local/scripts# pwd
/usr/local/scripts
root@NY-SBC:/usr/local/scripts# ls -la
total 28
drwxr-xr-x  2 root root 4096 Jan 13 01:48 .
drwxr-xr-x 11 root root 4096 Jan  5 18:26 ..
-rwxr-xr-x  1 root root 3095 Jan 13 01:48 get_value.sh
-rwxr-xr-x  1 root root  519 Jan 12 21:58 list_oids.sh
-rwxr-xr-x  1 root root  214 Jan 13 01:24 oid_exists.sh
-rwxr-xr-x  1 root root 4386 Jan 13 01:23 read_oid_persist.sh
root@NY-SBC:/usr/local/scripts#
read_oid_persist.sh (main script)
#!/bin/bash
LOG_FILE="/tmp/read_oid_persist.log"

echo "$(date) - Starting read_oid_persist.sh" >> "$LOG_FILE"

# Define external function interfaces
oid_exists() {
    # Call an external script that checks if the OID exists
    /usr/local/scripts/oid_exists.sh "$1"
}

list_oids() {
    # Call an external script that lists OIDs in order
    /usr/local/scripts/list_oids.sh
}

get_value() {
    # Call an external script to get the value for the given OID
    /usr/local/scripts/get_value.sh "$1"
}

while true; do
    read CMD
    echo "$(date) - Command: $CMD" >> "$LOG_FILE"

    if [ "$CMD" == "PING" ]; then
        echo "PONG"
        echo "$(date) - Responding to PING with PONG" >> "$LOG_FILE"
    else
        read OID
        echo "$(date) - OID: $OID" >> "$LOG_FILE"

        if [ "$CMD" == "get" ]; then
            if oid_exists "$OID"; then
                VALUE=$(get_value "$OID")
                TYPE="STRING"
                if [[ "$VALUE" =~ ^[0-9][0-9]*$ ]]; then
                    TYPE="INTEGER"
                fi
                echo "$OID"
                echo "$TYPE"
                echo "$VALUE"
                echo "$(date) - Returning value: $VALUE for OID: $OID, Type: $TYPE" >> "$LOG_FILE"
            else
                echo "NONE"
                echo "$(date) - OID not found: $OID" >> "$LOG_FILE"
            fi
        elif [ "$CMD" == "getnext" ]; then
            NEXT_OID=$(list_oids | grep -A 1 "^$OID\$" | tail -n 1)

            # Safety net: Check if NEXT_OID is the same as the original OID
            if [ "$NEXT_OID" == "$OID" ] || [ -z "$NEXT_OID" ]; then
                NEXT_OID=""
            fi

            if oid_exists "$NEXT_OID"; then
                VALUE=$(get_value "$NEXT_OID")
                TYPE="STRING"
                if [[ "$VALUE" =~ ^[0-9][0-9]*$ ]]; then
                    TYPE="INTEGER"
                fi
                echo "$NEXT_OID"
                echo "$TYPE"
                echo "$VALUE"
                echo "$(date) - Returning next OID: $NEXT_OID with value: $VALUE, Type: $TYPE" >> "$LOG_FILE"
            else
                echo "NONE"
                echo "$(date) - Next OID not found after: $OID" >> "$LOG_FILE"
            fi
        elif [ "$CMD" == "getbulk" ]; then
            read NON_REPEATERS MAX_REPETITIONS
            echo "$(date) - Non-repeaters: $NON_REPEATERS, Max-repetitions: $MAX_REPETITIONS" >> "$LOG_FILE"

            RESULTS=()
            CURRENT_OID=$OID

            for (( i=0; i<$NON_REPEATERS; i++ )); do
                if oid_exists "$CURRENT_OID"; then
                    VALUE=$(get_value "$CURRENT_OID")
                    TYPE="STRING"
                    if [[ "$VALUE" =~ ^[0-9][0-9]*$ ]]; then
                        TYPE="INTEGER"
                    fi
                    RESULTS+=("$CURRENT_OID")
                    RESULTS+=("$TYPE")
                    RESULTS+=("$VALUE")
                else
                    RESULTS+=("NONE")
                fi
                CURRENT_OID=$(list_oids | grep -A 1 "^$CURRENT_OID\$" | tail -n 1)

                # Safety net for non-repeaters
                if [ "$CURRENT_OID" == "$OID" ] || [ -z "$CURRENT_OID" ]; then
                    CURRENT_OID=""
                fi
            done

            for (( i=0; i<$MAX_REPETITIONS; i++ )); do
                if oid_exists "$CURRENT_OID"; then
                    VALUE=$(get_value "$CURRENT_OID")
                    TYPE="STRING"
                    if [[ "$VALUE" =~ ^[0-9][0-9]*$ ]]; then
                        TYPE="INTEGER"
                    fi
                    RESULTS+=("$CURRENT_OID")
                    RESULTS+=("$TYPE")
                    RESULTS+=("$VALUE")
                else
                    RESULTS+=("NONE")
                fi
                CURRENT_OID=$(list_oids | grep -A 1 "^$CURRENT_OID\$" | tail -n 1)

                # Safety net for max repetitions
                if [ "$CURRENT_OID" == "$OID" ] || [ -z "$CURRENT_OID" ]; then
                    CURRENT_OID=""
                fi
            done

            for RESULT in "${RESULTS[@]}"; do
                echo "$RESULT"
            done

            echo "$(date) - Returning bulk results for OID: $OID" >> "$LOG_FILE"
        else
            echo "NONE"
            echo "$(date) - Unknown command: $CMD" >> "$LOG_FILE"
        fi
    fi
done
list_oids.sh (my ‘ls -A’ drop-in replacement)
#!/bin/bash

# Replacement for "ls" command to mimic directory contents with correct order

# Base OID
BASE_OID=".1.3.6.1.4.1.9999.10701.1"

# Get the number of gateways directly
NUM_GATEWAYS=$(sudo /usr/bin/fs_cli -x 'sofia status gateway' | grep gateways: | awk '{print $1}')

# Print OIDs in the required order
echo "$BASE_OID"

# Loop through static entries and dynamic rows
for ((i=1; i<=4; i++)); do
    echo "$BASE_OID.$i"

    for ((j=1; j<=NUM_GATEWAYS; j++)); do
        echo "$BASE_OID.$i.$j"
    done
done
oid_exists.sh (my “-z” bash if-file-exists conditional drop-in)
#!/bin/bash

OID="$1"

# Check if OID exists by looking for it in the output of list_oids.sh
if /usr/local/scripts/list_oids.sh | grep -q "^$OID$"; then
    exit 0  # OID found
else
    exit 1  # OID not found
fi
get_value.sh (my “cat” drop-in replacement)
#!/bin/bash

# Ensure the OID is provided as an argument
if [ -z "$1" ]; then
  echo "Usage: $0 <OID>"
  exit 1
fi

# Define a function to retrieve the Nth gateway
get_nth_gateway() {
  local N=$1
  sudo fs_cli -x 'sofia status gateway' | grep '@' | awk '{print $1}' | sed -n "${N}p"
}

# Unpack the OID to determine which gateway and which metric
OID=$1

# Example OID structure: .1.3.6.1.4.1.9999.10701.1.<metric_type>.<gateway_index>
# Extract the metric type from the second-to-last part of the OID
METRIC_INDEX=$(echo "$OID" | awk -F'.' '{print $(NF-1)}')

# Extract the gateway index from the last part of the OID
GATEWAY_INDEX=$(echo "$OID" | awk -F'.' '{print $NF}')

# Define the anchor OIDs and their hard-coded return values
ANCHOR_OIDS=(
    ".1.3.6.1.4.1.9999.10701.1"
    ".1.3.6.1.4.1.9999.10701.1.1"
    ".1.3.6.1.4.1.9999.10701.1.2"
    ".1.3.6.1.4.1.9999.10701.1.3"
    ".1.3.6.1.4.1.9999.10701.1.4"
)

# Define the corresponding hard-coded values for the anchor OIDs
ANCHOR_VALUES=(
    "gatewayTable"
    "gatewayIndex"
    "gatewayDescr"
    "gatewayStatus"
    "gatewayCalls"
)

# Check if the OID is one of the anchor OIDs
for i in "${!ANCHOR_OIDS[@]}"; do
    if [ "$OID" == "${ANCHOR_OIDS[$i]}" ]; then
        # Return the hard-coded value corresponding to the anchor OID
        echo "${ANCHOR_VALUES[$i]}"
        exit 0
    fi
done

# Get the gateway name using the embedded function
GATEWAY=$(get_nth_gateway "$GATEWAY_INDEX")

# Extract the specific metric for this gateway
case "$METRIC_INDEX" in
    "1")
        # gatewayIndex (just return the gateway index)
        METRIC_NAME="gatewayIndex"
        METRIC_VALUE="$GATEWAY_INDEX"
        ;;
    "2")
        # gatewayDescr (use the DESCR for the description)
        METRIC_NAME="gatewayDescr"
        # Extract the description (the part after the "::")
        DESCR=$(echo "$GATEWAY" | sed 's/.*:://')
        METRIC_VALUE="$DESCR"
        ;;
    "3")
        # gatewayStatus (1=UP, 2=DOWN)
        METRIC_NAME="gatewayStatus"
        METRIC_VALUE=$(sudo /usr/bin/fs_cli -x "sofia status gateway $GATEWAY" | awk '/^Status/ {print $2}')

        # Convert numeric status to string (1=UP, 2=DOWN), but return numeric value
        if [ "$METRIC_VALUE" == "UP" ]; then
            METRIC_VALUE="1"
        elif [ "$METRIC_VALUE" == "DOWN" ]; then
            METRIC_VALUE="2"
        else
            METRIC_VALUE="UNKNOWN"  # Handle unexpected values
        fi
        ;;
    "4")
        # gatewayCalls (fetching active calls from sofia status)
        METRIC_NAME="gatewayCalls"
        # Extract the profile (the part before the "::")
        PROFILE=$(echo "$GATEWAY" | sed 's/::.*//')
        METRIC_VALUE=$(sudo /usr/bin/fs_cli -x "sofia status" | awk -v profile="$PROFILE" '$1 == profile {gsub(/[()]/, "", $5); print $5}')

        # If we did not find a value, set it to 0 (or handle as needed)
        if [ -z "$METRIC_VALUE" ]; then
            METRIC_VALUE="0"
        fi
        ;;
    *)
        echo "Unsupported metric type: $METRIC_INDEX"
        exit 2
        ;;
esac

echo "$METRIC_VALUE"
Validation
To ensure the robustness of the solution, I conducted extensive testing, covering a wide range of edge cases. The following examples are just a few key queries demonstrating that the solution is working as intended. This section reflects a fraction of the comprehensive validation efforts undertaken.
Idle system
root@NY-SBC:~# snmpwalk -v2c -c public localhost .1.3.6.1.4.1.9999.10701.1
SNMPv2-SMI::enterprises.9999.10701.1.1 = STRING: "gatewayIndex"
SNMPv2-SMI::enterprises.9999.10701.1.1.1 = INTEGER: 1
SNMPv2-SMI::enterprises.9999.10701.1.1.2 = INTEGER: 2
SNMPv2-SMI::enterprises.9999.10701.1.2 = STRING: "gatewayDescr"
SNMPv2-SMI::enterprises.9999.10701.1.2.1 = STRING: "chi-sbc"
SNMPv2-SMI::enterprises.9999.10701.1.2.2 = STRING: "la-sbc"
SNMPv2-SMI::enterprises.9999.10701.1.3 = STRING: "gatewayStatus"
SNMPv2-SMI::enterprises.9999.10701.1.3.1 = INTEGER: 1
SNMPv2-SMI::enterprises.9999.10701.1.3.2 = INTEGER: 1
SNMPv2-SMI::enterprises.9999.10701.1.4 = STRING: "gatewayCalls"
SNMPv2-SMI::enterprises.9999.10701.1.4.1 = INTEGER: 0
SNMPv2-SMI::enterprises.9999.10701.1.4.2 = INTEGER: 0
root@NY-SBC:~#
With a call placed on the trunk to chi-sbc
root@NY-SBC:~# snmpwalk -v2c -c public localhost .1.3.6.1.4.1.9999.10701.1
SNMPv2-SMI::enterprises.9999.10701.1.1 = STRING: "gatewayIndex"
SNMPv2-SMI::enterprises.9999.10701.1.1.1 = INTEGER: 1
SNMPv2-SMI::enterprises.9999.10701.1.1.2 = INTEGER: 2
SNMPv2-SMI::enterprises.9999.10701.1.2 = STRING: "gatewayDescr"
SNMPv2-SMI::enterprises.9999.10701.1.2.1 = STRING: "chi-sbc"
SNMPv2-SMI::enterprises.9999.10701.1.2.2 = STRING: "la-sbc"
SNMPv2-SMI::enterprises.9999.10701.1.3 = STRING: "gatewayStatus"
SNMPv2-SMI::enterprises.9999.10701.1.3.1 = INTEGER: 1
SNMPv2-SMI::enterprises.9999.10701.1.3.2 = INTEGER: 1
SNMPv2-SMI::enterprises.9999.10701.1.4 = STRING: "gatewayCalls"
SNMPv2-SMI::enterprises.9999.10701.1.4.1 = INTEGER: 1
SNMPv2-SMI::enterprises.9999.10701.1.4.2 = INTEGER: 0
With the SIP trunk NIC administratively forced to “DOWN” status on chi-sbc, after 30 seconds:
root@NY-SBC:~# snmpwalk -v2c -c public localhost .1.3.6.1.4.1.9999.10701.1
SNMPv2-SMI::enterprises.9999.10701.1.1 = STRING: "gatewayIndex"
SNMPv2-SMI::enterprises.9999.10701.1.1.1 = INTEGER: 1
SNMPv2-SMI::enterprises.9999.10701.1.1.2 = INTEGER: 2
SNMPv2-SMI::enterprises.9999.10701.1.2 = STRING: "gatewayDescr"
SNMPv2-SMI::enterprises.9999.10701.1.2.1 = STRING: "chi-sbc"
SNMPv2-SMI::enterprises.9999.10701.1.2.2 = STRING: "la-sbc"
SNMPv2-SMI::enterprises.9999.10701.1.3 = STRING: "gatewayStatus"
SNMPv2-SMI::enterprises.9999.10701.1.3.1 = INTEGER: 2
SNMPv2-SMI::enterprises.9999.10701.1.3.2 = INTEGER: 1
SNMPv2-SMI::enterprises.9999.10701.1.4 = STRING: "gatewayCalls"
SNMPv2-SMI::enterprises.9999.10701.1.4.1 = INTEGER: 1
SNMPv2-SMI::enterprises.9999.10701.1.4.2 = INTEGER: 0
root@NY-SBC:~#
root@NY-SBC:~#
After defining a third SIP Trunk targeting a new peer SBC “slc-sbc” (which is not online):
root@NY-SBC:~# snmpwalk -v2c -c public localhost .1.3.6.1.4.1.9999.10701.1
SNMPv2-SMI::enterprises.9999.10701.1.1 = STRING: "gatewayIndex"
SNMPv2-SMI::enterprises.9999.10701.1.1.1 = INTEGER: 1
SNMPv2-SMI::enterprises.9999.10701.1.1.2 = INTEGER: 2
SNMPv2-SMI::enterprises.9999.10701.1.1.3 = INTEGER: 3
SNMPv2-SMI::enterprises.9999.10701.1.2 = STRING: "gatewayDescr"
SNMPv2-SMI::enterprises.9999.10701.1.2.1 = STRING: "slc-sbc"
SNMPv2-SMI::enterprises.9999.10701.1.2.2 = STRING: "chi-sbc"
SNMPv2-SMI::enterprises.9999.10701.1.2.3 = STRING: "la-sbc"
SNMPv2-SMI::enterprises.9999.10701.1.3 = STRING: "gatewayStatus"
SNMPv2-SMI::enterprises.9999.10701.1.3.1 = INTEGER: 2
SNMPv2-SMI::enterprises.9999.10701.1.3.2 = INTEGER: 2
SNMPv2-SMI::enterprises.9999.10701.1.3.3 = INTEGER: 1
SNMPv2-SMI::enterprises.9999.10701.1.4 = STRING: "gatewayCalls"
SNMPv2-SMI::enterprises.9999.10701.1.4.1 = INTEGER: 0
SNMPv2-SMI::enterprises.9999.10701.1.4.2 = INTEGER: 0
SNMPv2-SMI::enterprises.9999.10701.1.4.3 = INTEGER: 0
root@NY-SBC:~#
After reverting the downed NIC back to “UP” state on chi-sbc:
root@NY-SBC:~# snmpwalk -v2c -c public localhost .1.3.6.1.4.1.9999.10701.1
SNMPv2-SMI::enterprises.9999.10701.1.1 = STRING: "gatewayIndex"
SNMPv2-SMI::enterprises.9999.10701.1.1.1 = INTEGER: 1
SNMPv2-SMI::enterprises.9999.10701.1.1.2 = INTEGER: 2
SNMPv2-SMI::enterprises.9999.10701.1.1.3 = INTEGER: 3
SNMPv2-SMI::enterprises.9999.10701.1.2 = STRING: "gatewayDescr"
SNMPv2-SMI::enterprises.9999.10701.1.2.1 = STRING: "slc-sbc"
SNMPv2-SMI::enterprises.9999.10701.1.2.2 = STRING: "chi-sbc"
SNMPv2-SMI::enterprises.9999.10701.1.2.3 = STRING: "la-sbc"
SNMPv2-SMI::enterprises.9999.10701.1.3 = STRING: "gatewayStatus"
SNMPv2-SMI::enterprises.9999.10701.1.3.1 = INTEGER: 2
SNMPv2-SMI::enterprises.9999.10701.1.3.2 = INTEGER: 1
SNMPv2-SMI::enterprises.9999.10701.1.3.3 = INTEGER: 1
SNMPv2-SMI::enterprises.9999.10701.1.4 = STRING: "gatewayCalls"
SNMPv2-SMI::enterprises.9999.10701.1.4.1 = INTEGER: 0
SNMPv2-SMI::enterprises.9999.10701.1.4.2 = INTEGER: 0
SNMPv2-SMI::enterprises.9999.10701.1.4.3 = INTEGER: 0
root@NY-SBC:~#
Test via the snmpbulkwalk utility to exercise GET BULK code path:
root@NY-SBC:~# snmpbulkwalk -v2c -c public localhost .1.3.6.1.4.1.9999.10701.1
SNMPv2-SMI::enterprises.9999.10701.1.1 = STRING: "gatewayIndex"
SNMPv2-SMI::enterprises.9999.10701.1.1.1 = INTEGER: 1
SNMPv2-SMI::enterprises.9999.10701.1.1.2 = INTEGER: 2
SNMPv2-SMI::enterprises.9999.10701.1.1.3 = INTEGER: 3
SNMPv2-SMI::enterprises.9999.10701.1.2 = STRING: "gatewayDescr"
SNMPv2-SMI::enterprises.9999.10701.1.2.1 = STRING: "slc-sbc"
SNMPv2-SMI::enterprises.9999.10701.1.2.2 = STRING: "chi-sbc"
SNMPv2-SMI::enterprises.9999.10701.1.2.3 = STRING: "la-sbc"
SNMPv2-SMI::enterprises.9999.10701.1.3 = STRING: "gatewayStatus"
SNMPv2-SMI::enterprises.9999.10701.1.3.1 = INTEGER: 2
SNMPv2-SMI::enterprises.9999.10701.1.3.2 = INTEGER: 1
SNMPv2-SMI::enterprises.9999.10701.1.3.3 = INTEGER: 1
SNMPv2-SMI::enterprises.9999.10701.1.4 = STRING: "gatewayCalls"
SNMPv2-SMI::enterprises.9999.10701.1.4.1 = INTEGER: 0
SNMPv2-SMI::enterprises.9999.10701.1.4.2 = INTEGER: 0
SNMPv2-SMI::enterprises.9999.10701.1.4.3 = INTEGER: 0
root@NY-SBC:~#
Closing Thoughts
This project demonstrates my ability to design and implement a custom SNMP monitoring solution for FreeSWITCH metrics, emphasizing a strategic and modular approach. From initial prototyping with dummy data to integrating live metrics, it showcases my dedication to building effective, real-world solutions.
The thorough testing and validation efforts reflect my focus on ensuring robustness and reliability. My determination and commitment to follow-through have been crucial in delivering this project.
I look forward to discussing the project further and appreciate the opportunity to demonstrate my approach to systems administration challenges with creativity and precision.